Epson Stylus Pro 10600 - Photographic Dye Ink Product Information Guide - Page 11
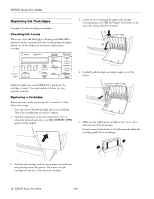
Switching Between Black Ink Modes, Replacing the Black Ink Cartridge
 |
View all Epson Stylus Pro 10600 - Photographic Dye Ink manuals
Add to My Manuals
Save this manual to your list of manuals |
Page 11 highlights
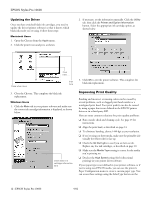
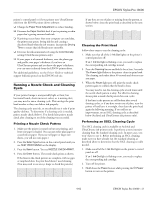
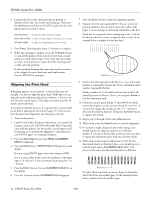
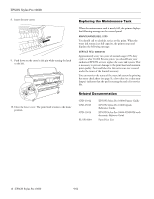
7. Push the cartridge clamp back up. Make sure the corresponding Ink Out light goes off. Then close the ink compartment cover. EPSON Stylus Pro 10600 Replacing the Black Ink Cartridge Before starting, make sure you have: ❏ the draining cartridge that came with your printer ❏ the replacement black ink cartridge you plan to install Follow these steps to switch black ink modes: 1. Turn on the printer and wait until READY is displayed on the control panel. 2. Make sure that no Ink Out lights are on or flashing. If any cartridges are low on ink, you have to replace them first. 3. Press the SelecType button until MAINTENANCE MENU is displayed on the control panel. 4. Press the Item button until you see BK INK CHANGE=EXEC, then press Enter. The control panel displays OPEN INK COVER. 5. Open the ink compartment cover and remove the black ink cartridge. (Press down on the top of the cartridge clamp to release it, then pull out the cartridge.) Switching Between Black Ink Modes If your printer uses EPSON UltraChrome ink, you can switch between black ink modes to optimize your black ink density: Black ink modes Mode Image and paper type Photo Black Mode For printing photographic images on all media types. Optimized for traditional photographic and ink jet-coated papers, such as EPSON Premium Luster Photo Paper, Photo Semigloss Paper, or Premium Semimatte Photo Paper. Matte Black Mode Optimized for printing photographic images on matte or plain papers, such as EPSON Enhanced Matte Paper, Smooth and Textured Fine Art Paper, and Somerset Velvet for EPSON, when the highest level of photographic quality is desired. 6. Insert the draining cartridge into the black ink slot. Close the ink cartridge clamp, then close the cover. The printer begins draining the ink, and you see a message on the control panel indicating the progress. 7. Once draining is complete, you see the message OPEN INK COVER. Open the ink compartment cover and remove the draining cartridge. 8. When you see the message INSERT BK INK on the control panel, insert the new (replacement) black ink cartridge. Then close the ink compartment cover. You see a message on the control panel indicating the progress of the black ink charging. When done, K: EPSON GENUINE INK is displayed. Continue on to the next section to update your printer driver software. 9/02 EPSON Stylus Pro 10600 - 11
-
 1
1 -
2
-
3
-
4
-
5
-
 6
6 -
 7
7 -
 8
8 -
 9
9 -
 10
10 -
 11
11 -
 12
12 -
 13
13 -
 14
14 -
 15
15 -
 16
16
 |
 |
