Epson Stylus Pro 7600 - Photographic Dye Ink User Manual - Page 167
Solving Problems, Error messages continued
 |
View all Epson Stylus Pro 7600 - Photographic Dye Ink manuals
Add to My Manuals
Save this manual to your list of manuals |
Page 167 highlights
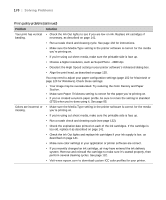
Solving Problems | 167 Error messages (continued) Message Light LOAD PAPER Paper Out light on LOAD ROLL PAPER LOAD SHEET PAPER PAPER JAM PAPER NOT CUT Paper Out light on Paper Out light flashing Paper Out light flashing PAPER NOT STRAIGHT PAPER OUT Paper Out light flashing Paper Out light on RELOAD PAPER Paper Out light on SET PAPER LEVER Paper Out light on Explanation Response Paper lever is in the released position (all the way back) while loading paper. After you finish loading paper, pull the paper lever all the way forward, to the secured position. Paper source setting in printer software is different from control panel. Make sure the right paper is loaded and the paper source setting is the same on the control panel and printer software. Paper has jammed in the printer. Remove the jammed paper. See page 179 for more information. Roll paper was not cut completely. Cut the paper manually, then remove the cut paper from the printer. Reload paper, as described on page 42. Cut paper did not fall off. Remove the cut paper from the printer. Reload paper. Paper slipped and fed into the printer at an angle. Reload paper, making sure the edges are straight and aligned with the vertical row of holes at the paper exit. No paper is loaded. Load paper. Paper ran out. Remove any printouts or paper remaining in the printer and load more paper. If the message appears during a print job, reset the printer by pressing the Pause button for 3 seconds. Then load paper and resend the job. Paper could not be reversed into the printing position. Remove the paper. Reload it so that the bottom edge is straight and aligned with the vertical row of holes at the paper exit. Image is too wide for Resize your image or load wider paper. the paper loaded in the printer. Paper is not loaded correctly. Load the paper into the printer as described on page 69 (for roll paper) or page 77 (for sheets). Paper lever was released during the printing process or another operation. Pull the lever all the way forward, to the secured position. Start printing again from the beginning for best results. 6-167
-
 1
1 -
2
-
3
-
4
-
5
-
6
-
7
-
8
-
9
-
10
-
11
-
12
-
13
-
14
-
15
-
16
-
17
-
18
-
19
-
20
-
21
-
22
-
23
-
24
-
25
-
26
-
27
-
28
-
29
-
30
-
31
-
32
-
33
-
34
-
35
-
36
-
37
-
38
-
39
-
40
-
41
-
42
-
43
-
44
-
45
-
46
-
47
-
48
-
49
-
50
-
51
-
52
-
53
-
54
-
55
-
56
-
57
-
58
-
59
-
60
-
61
-
62
-
63
-
64
-
65
-
66
-
67
-
68
-
69
-
70
-
71
-
72
-
73
-
74
-
75
-
76
-
77
-
78
-
79
-
80
-
81
-
82
-
83
-
84
-
85
-
86
-
87
-
88
-
89
-
90
-
91
-
92
-
93
-
94
-
95
-
96
-
97
-
98
-
99
-
100
-
101
-
102
-
103
-
104
-
105
-
106
-
107
-
108
-
109
-
110
-
111
-
112
-
113
-
114
-
115
-
116
-
117
-
118
-
119
-
120
-
121
-
122
-
123
-
124
-
125
-
126
-
127
-
128
-
129
-
130
-
131
-
132
-
133
-
134
-
135
-
136
-
137
-
138
-
139
-
140
-
141
-
142
-
143
-
144
-
145
-
146
-
147
-
148
-
149
-
150
-
151
-
152
-
153
-
154
-
155
-
156
-
157
-
158
-
159
-
160
-
161
-
 162
162 -
 163
163 -
 164
164 -
 165
165 -
 166
166 -
 167
167 -
 168
168 -
 169
169 -
 170
170 -
 171
171 -
 172
172 -
173
-
174
-
175
-
176
-
177
-
178
-
179
-
180
-
181
-
182
-
183
-
184
-
185
-
186
-
187
-
188
-
189
-
190
-
191
-
192
 |
 |
