Epson Stylus Pro 9880 ColorBurst Edition Printer Guide - Page 42
folder, and start the, open
 |
View all Epson Stylus Pro 9880 ColorBurst Edition manuals
Add to My Manuals
Save this manual to your list of manuals |
Page 42 highlights
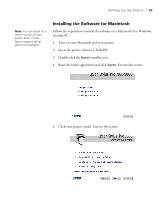
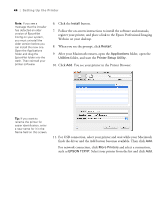
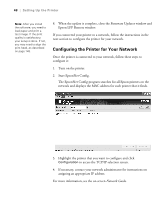
44 | Setting Up the Printer Note: If you see a message that the installer has detected an older version of EpsonNet Config on your system, you must uninstall the older version before you can install the new one. Open the Applications folder and drag the EpsonNet folder into the trash. Then reinstall your printer software. 6. Click the Install button. 7. Follow the on-screen instructions to install the software and manuals, register your printer, and place a link to the Epson Professional Imaging Website on your desktop. 8. When you see the prompt, click Restart. 9. After your Macintosh restarts, open the Applications folder, open the Utilities folder, and start the Printer Setup Utility. 10. Click Add. You see your printer in the Printer Browser: Tip: If you want to rename the printer for easier identification, enter a new name for it in the Name field on this screen. 11. For USB connection, select your printer and wait while your Macintosh finds the driver and the Add button becomes available. Then click Add. For network connection, click More Printers and select a connection, such as EPSON TCP/IP. Select your printer from the list and click Add. 44
-
 1
1 -
2
-
3
-
4
-
5
-
6
-
7
-
8
-
9
-
10
-
11
-
12
-
13
-
14
-
15
-
16
-
17
-
18
-
19
-
20
-
21
-
22
-
23
-
24
-
25
-
26
-
27
-
28
-
29
-
30
-
31
-
32
-
33
-
34
-
35
-
36
-
 37
37 -
 38
38 -
 39
39 -
 40
40 -
 41
41 -
 42
42 -
 43
43 -
 44
44 -
 45
45 -
 46
46 -
 47
47 -
48
-
49
-
50
-
51
-
52
-
53
-
54
-
55
-
56
-
57
-
58
-
59
-
60
-
61
-
62
-
63
-
64
-
65
-
66
-
67
-
68
-
69
-
70
-
71
-
72
-
73
-
74
-
75
-
76
-
77
-
78
-
79
-
80
-
81
-
82
-
83
-
84
-
85
-
86
-
87
-
88
-
89
-
90
-
91
-
92
-
93
-
94
-
95
-
96
-
97
-
98
-
99
-
100
-
101
-
102
-
103
-
104
-
105
-
106
-
107
-
108
-
109
-
110
-
111
-
112
-
113
-
114
-
115
-
116
-
117
-
118
-
119
-
120
-
121
-
122
-
123
-
124
-
125
-
126
-
127
-
128
-
129
-
130
-
131
-
132
-
133
-
134
-
135
-
136
-
137
-
138
-
139
-
140
-
141
-
142
-
143
-
144
-
145
-
146
-
147
-
148
-
149
-
150
-
151
-
152
-
153
-
154
-
155
-
156
-
157
-
158
-
159
-
160
-
161
-
162
-
163
-
164
-
165
-
166
-
167
-
168
-
169
-
170
-
171
-
172
-
173
-
174
-
175
-
176
 |
 |
