Epson SureColor P9000 Commercial Edition User Manual - Page 32
SC-P6000/SC-P8000
 |
View all Epson SureColor P9000 Commercial Edition manuals
Add to My Manuals
Save this manual to your list of manuals |
Page 32 highlights
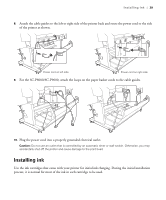
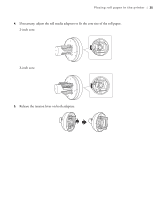
Installing ink | 31 4. Remove the ink cartridges from their packages, then gently shake each cartridge for about 5 seconds. 5. Install the ink cartridges in the slots that correspond to each cartridge. SC-P6000/SC-P8000: Left ink bay Slot no. Cartridge 1 Cyan (C) 2 Yellow (Y) 3 Light Cyan (LC) 4 Matte Black (MK) 5 Photo Black (PK) Right ink bay Slot no. Cartridge 6 Vivid Magenta (VM) 7 Light Black (LK) 8 Light Light Black (LLK) 9 Vivid Light Magenta (VLM) SC-P7000/SC-P9000: Left ink bay Slot no. Cartridge 1 Cyan (C) 2 Orange (OR) 3 Yellow (Y) 4 Light Cyan (LC) 5 Matte Black (MK) 6 Photo Black (PK) Right ink bay Slot no. Cartridge 7 Vivid Magenta (VM) 8 Light Black (LK) 9 Green (GR) 10 Light Light Black (LLK) or Violet (V) 11 Vivid Light Magenta (VLM) Caution: For the SC-P7000/SC-P9000, you must choose the Select ColorMode setting that matches the ink cartridge that was included with your printer. The Standard edition for photographic and fine art printing includes the Light Light Black (LLK) cartridge, while the Commercial edition for graphic arts and proofing applications includes the Violet (V) cartridge. This setting cannot be changed once the initial ink charging process begins.
-
 1
1 -
2
-
3
-
4
-
5
-
6
-
7
-
8
-
9
-
10
-
11
-
12
-
13
-
14
-
15
-
16
-
17
-
18
-
19
-
20
-
21
-
22
-
23
-
24
-
25
-
26
-
 27
27 -
 28
28 -
 29
29 -
 30
30 -
 31
31 -
 32
32 -
 33
33 -
 34
34 -
 35
35 -
 36
36 -
 37
37 -
38
-
39
-
40
-
41
-
42
-
43
-
44
-
45
-
46
 |
 |
