Epson SureLab D3000 Administrator Guide - Page 41
Line Scan, Spot Scan, When reading is successful, the data is displayed
 |
View all Epson SureLab D3000 manuals
Add to My Manuals
Save this manual to your list of manuals |
Page 41 highlights
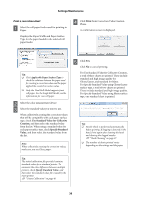
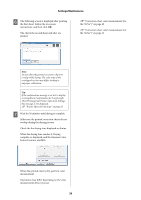
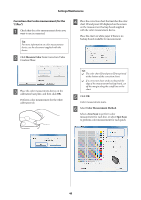
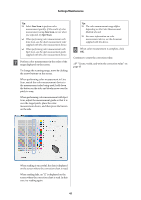
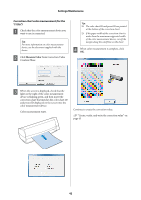
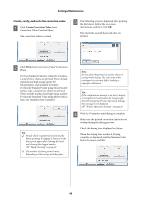
Settings/Maintenance Tip: O Select Line Scan to perform color measurement quickly. If the results of color measurement using Line Scan are not what you expected, try Spot Scan. O When performing color measurement with Line Scan, use the chart measurement ruler supplied with the color measurement device. O When performing color measurement with Spot Scan, use the spot measurement guide supplied with the color measurement device. G Perform color measurement in the order of the range displayed on the screen. To change the scanning range, move by clicking the arrow buttons on the screen. When performing color measurement in Line Scan, match the color measurement device to the measurement ruler being used, hold down the button on the side, and slowly move over the patch to scan. When performing color measurement with Spot Scan, adjust the measurement guide so that it is over the target patch, place the color measurement device, and then press the button on the side. Tip: O The color measurement range differs depending on the Color Measurement Method selected. O For more information on color measurement device, see the document supplied with the device. H When color measurement is complete, click OK. Continue to create the correction value. U "Create, verify, and write the correction value" on page 43 When reading is successful, the data is displayed on the screen where the correction chart is read. When reading fails, an "X" is displayed on the screen where the correction chart is read. In this case, try reading again. 41
-
 1
1 -
2
-
3
-
4
-
5
-
6
-
7
-
8
-
9
-
10
-
11
-
12
-
13
-
14
-
15
-
16
-
17
-
18
-
19
-
20
-
21
-
22
-
23
-
24
-
25
-
26
-
27
-
28
-
29
-
30
-
31
-
32
-
33
-
34
-
35
-
 36
36 -
 37
37 -
 38
38 -
 39
39 -
 40
40 -
 41
41 -
 42
42 -
 43
43 -
 44
44 -
 45
45 -
 46
46 -
47
-
48
-
49
-
50
-
51
-
52
-
53
-
54
-
55
-
56
-
57
-
58
-
59
-
60
-
61
-
62
-
63
-
64
-
65
-
66
-
67
-
68
-
69
-
70
-
71
-
72
-
73
-
74
-
75
-
76
-
77
-
78
-
79
-
80
-
81
-
82
-
83
-
84
-
85
-
86
-
87
-
88
-
89
-
90
-
91
-
92
-
93
-
94
-
95
-
96
 |
 |
