Epson T3270 User Manual - Page 35
Register Network Interface Address Directly to DNS Server
 |
View all Epson T3270 manuals
Add to My Manuals
Save this manual to your list of manuals |
Page 35 highlights
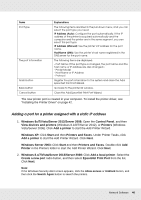
5. To assign an IP address manually, enter the IP address, the subnet mask, and the default gateway. Be sure the IP address does not conflict with any other devices on the network. Note: If there is a server or a router functioning as a gateway, enter the IP address of the server or the router for the gateway address. If there is no gateway, leave the default values there. 6. If you want to get a private address between 169.254.1.1 and 169.254.254.254 automatically when an IP address cannot be obtained by the DHCP server, leave it set to Enable for Set Using Automatic Private IP Addressing (APIPA); otherwise, select Disable. 7. When setting an IP address using the ping command, select Enable for Set Using PING. Select Disable when setting an IP address with EpsonNet Config; this prevents any unexpected change of the IP address. 8. Select Enable for Acquire DNS Server Address Automatically if you want to acquire the DNS server address using the DHCP server. If you want to enter the DNS server address manually, select Disable and then enter the IP address of the DNS server. 9. Select Enable for Acquire Host Name and Domain Name Automatically if you want to acquire the host name and the domain name using the DHCP server. If you want to specify manually, enter the host name and the domain name in the text boxes. 10. Select Enable for Register Network Interface Address to DNS Server if you want to register the host name and domain name to the DNS server through the DHCP server that supports Dynamic DNS. If you want to register the host name and the domain name directly to the DNS server, select Enable for Register Network Interface Address Directly to DNS Server. 11. For OS X users: Select Enable or Disable for Use Bonjour. If you select Enable, enter the Bonjour Name and Bonjour Printer Name. 12. Do not exit the Web browser and do not send a job to the printer until after you follow the on-screen instructions to reset the printer. Note: ❏ Since the new IP address becomes available after the printer is reset, you need to restart EpsonNet Config by entering the new IP address. ❏ Only changes on the page where you press the Transmit button take effect. Network Software 35
-
 1
1 -
2
-
3
-
4
-
5
-
6
-
7
-
8
-
9
-
10
-
11
-
12
-
13
-
14
-
15
-
16
-
17
-
18
-
19
-
20
-
21
-
22
-
23
-
24
-
25
-
26
-
27
-
28
-
29
-
 30
30 -
 31
31 -
 32
32 -
 33
33 -
 34
34 -
 35
35 -
 36
36 -
 37
37 -
 38
38 -
 39
39 -
 40
40 -
41
-
42
-
43
-
44
-
45
-
46
-
47
-
48
-
49
-
50
-
51
-
52
-
53
-
54
-
55
 |
 |
