Epson T5270D User Manual - Page 42
Finish, Have Disk, Close the installer screen if it appears.
 |
View all Epson T5270D manuals
Add to My Manuals
Save this manual to your list of manuals |
Page 42 highlights
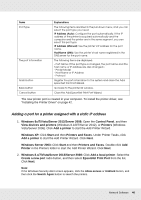
5. Confirm the information about the printer's port you want to configure, and then click Finish. Items The port Information Finish button Back button Cancel button Explanations The following items are displayed: - Port Name - Host Name or IP Address - Protocol Register the port information to the system and close the Add EpsonNet Print Port Wizard. Go back to the printer list window. Close the Add EpsonNet Print Port Wizard. The new printer port is created in your computer. To install the printer driver, see "Installing the Printer Driver" on page 42. Installing the Printer Driver Install the printer driver on your computer using the Software Disc that came with your printer or the software package that you downloaded. See "Installing the Printer Driver" on page 21. Note: Some buttons in these steps may be slightly different depending on your operating system. 1. Insert the Software Disc shipped with the printer. 2. Close the installer screen if it appears. 3. On the Add Printer screen, click the Have Disk button. The Install From Disk dialog box appears. Network Software 42
-
 1
1 -
2
-
3
-
4
-
5
-
6
-
7
-
8
-
9
-
10
-
11
-
12
-
13
-
14
-
15
-
16
-
17
-
18
-
19
-
20
-
21
-
22
-
23
-
24
-
25
-
26
-
27
-
28
-
29
-
30
-
31
-
32
-
33
-
34
-
35
-
36
-
 37
37 -
 38
38 -
 39
39 -
 40
40 -
 41
41 -
 42
42 -
 43
43 -
 44
44 -
 45
45 -
 46
46 -
 47
47 -
48
-
49
-
50
-
51
-
52
-
53
-
54
-
55
 |
 |
