Epson T7270D User Manual - Page 38
Adding a port for a printer assigned with a dynamic IP address
 |
View all Epson T7270D manuals
Add to My Manuals
Save this manual to your list of manuals |
Page 38 highlights
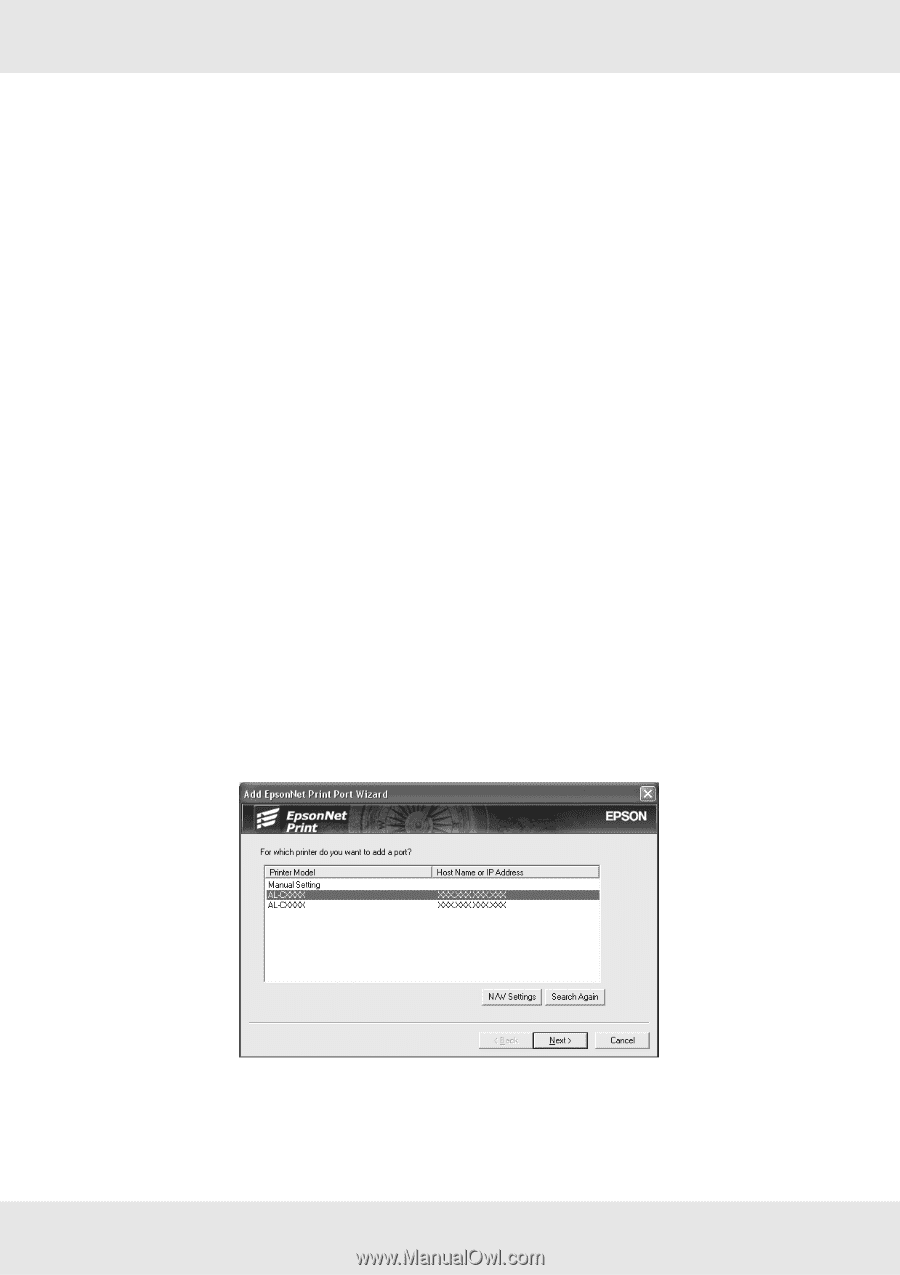
Adding a port for a printer assigned with a dynamic IP address 1. Windows 8.x/7/Vista/Server 2012/Server 2008: Open the Control Panel, and then select View devices and printers (Windows 8.x/7/Server 2012) or Printers (Windows Vista/Server 2008). Click Add a printer to start the Add Printer Wizard. Windows XP: Click Start and then Printers and Faxes. Under Printer Tasks, click Add a printer to start the Add Printer Wizard. Click Next. Windows Server 2003: Click Start and then Printers and Faxes. Double-click Add Printer to start the Add Printer Wizard. Click Next. 2. Windows 8.x/7/Vista/Server 2012/Server 2008: Click Add a local printer. Select the Create a new port radio button, and then select EpsonNet Print Port from the list. Click Next. Note: If the Windows Security Alert screen appears, click the Allow access or Unblock button, and then click the Search Again button to search the printers. Windows XP/Server 2003: Click Local printer attached to this computer, clear the Automatically detect and install my Plug and Play printer check box, and then click Next. Select the Create a new port radio button, and then select EpsonNet Print Port from the list. Click Next. Note: If the Windows Security Alert screen appears, click the Unblock button, and then click the Search Again button to search the printers. 3. Select the target printer, and then click Next. Network Software 38
-
 1
1 -
2
-
3
-
4
-
5
-
6
-
7
-
8
-
9
-
10
-
11
-
12
-
13
-
14
-
15
-
16
-
17
-
18
-
19
-
20
-
21
-
22
-
23
-
24
-
25
-
26
-
27
-
28
-
29
-
30
-
31
-
32
-
 33
33 -
 34
34 -
 35
35 -
 36
36 -
 37
37 -
 38
38 -
 39
39 -
 40
40 -
 41
41 -
 42
42 -
 43
43 -
44
-
45
-
46
-
47
-
48
-
49
-
50
-
51
-
52
-
53
-
54
-
55
 |
 |