Epson WF-100 Quick Guide and Warranty - Page 4
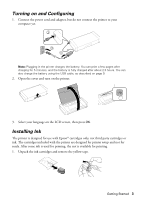
black cartridge is on the left and the color cartridge is on the right.
 |
View all Epson WF-100 manuals
Add to My Manuals
Save this manual to your list of manuals |
Page 4 highlights
2. Remove the caps, but be careful not to touch the areas shown below. Note: Save the caps so you can recap ink cartridges before storing or disposing of them. 3. Open the inner cover. 4. Insert the cartridges at a slight angle as shown, then press into place. Make sure the black cartridge is on the left and the color cartridge is on the right. 5. Close the inner cover and press OK to begin ink priming, which takes about 4 minutes. Caution: Don't turn off the printer or raise the inner cover while the printer is priming or you'll waste ink. 4 Getting Started
-
 1
1 -
 2
2 -
 3
3 -
 4
4 -
 5
5 -
 6
6 -
 7
7 -
 8
8 -
 9
9 -
 10
10 -
11
-
12
-
13
-
14
-
15
-
16
-
17
-
18
-
19
-
20
-
21
-
22
-
23
-
24
-
25
-
26
-
27
-
28
-
29
-
30
-
31
-
32
 |
 |

4
Getting Started
2.
Remove the caps, but be careful not to touch the areas shown below.
Note:
Save the caps so you can recap ink cartridges before storing or disposing of
them.
3.
Open the inner cover.
4.
Insert the cartridges at a slight angle as shown, then press into place. Make sure the
black cartridge is on the left and the color cartridge is on the right.
5.
Close the inner cover and press
OK
to begin ink priming, which takes about
4 minutes.
Caution:
Don’t turn off the printer or raise the inner cover while the printer is priming or
you’ll waste ink.