Epson WorkForce 1100 Start Here - Page 6
Macintosh - software
 |
View all Epson WorkForce 1100 manuals
Add to My Manuals
Save this manual to your list of manuals |
Page 6 highlights
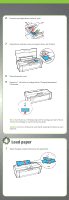
Macintosh® 1 Make sure the printer is NOT CONNECTED to your computer. 2 Insert the WorkForce 1100 Series software CD. 3 Double-click the Epson icon. 4 Click Install and follow the on-screen instructions. 5 When prompted, connect a USB cable. Use any open USB port on your computer. Make sure the printer is securely connected and turned on. 6 Mac OS X 10.5 users: skip to step 10. Other users: continue with step 7. 7 When you see this screen, click Add Printer. 8 Follow the steps on the right side of the screen to add the printer. 9 Click Next again, if necessary. 10 Follow the on-screen instructions to install the rest of the software and register your printer. 11 When you're done, eject the CD. You're ready to print! See your on-screen Epson Information Center for instructions.
-
 1
1 -
 2
2 -
 3
3 -
 4
4 -
 5
5 -
 6
6 -
 7
7 -
 8
8
 |
 |
