Epson XP-300 Start Here - Page 1
Epson XP-300 Manual
 |
View all Epson XP-300 manuals
Add to My Manuals
Save this manual to your list of manuals |
Page 1 highlights
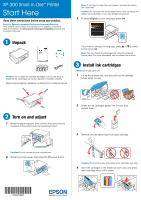
XP-300 Small-in-One™ Printer Start Here Read these instructions before using your product. Note for Spanish speakers/Nota para hispanohablantes: Para obtener instrucciones de configuración en español, consulte la Guía de instalación en www.epson.com/support/xp300sp (requiere una conexión a Internet). Note: If you want to lower the control panel, squeeze the release bar underneath. Caution: Do not lower the control panel without first squeezing the release bar underneath or you may damage the product. 3 To select English as your language, press OK. 1 Unpack Caution: Do not open ink cartridge packages until you are ready to install the ink. Cartridges are vacuum packed to maintain reliability. Remove all protective materials, including from inside the printer. If you want to change the language, press or to select it, then press OK. Note: You can change the language later using the product's control panel. For more information, see the online User's Guide. 3 Install ink cartridges Note: Don't load paper yet. 1 Lift up the scanner unit, and wait until the ink cartridge holder stops moving. 2 Turn on and adjust 1 Raise the paper support, then connect the power cord to the back of the printer and to an electrical outlet. 2 Shake the ink cartridges gently 4 or 5 times, then unpack them. 3 Remove only the yellow tape from each cartridge. Caution: Do not connect to your computer yet. 2 Raise the control panel, then press the power button. Caution: Don't remove any other seals or the cartridges may leak. 4 Insert the cartridges in the holder for each color, and press each cartridge down until it clicks. *412247200* *412247200*
-
 1
1 -
 2
2 -
 3
3 -
 4
4
 |
 |
