Eureka AirSpeed Bagged AS1050A Quick Start Guide - Page 1
Eureka AirSpeed Bagged AS1050A Manual
 |
View all Eureka AirSpeed Bagged AS1050A manuals
Add to My Manuals
Save this manual to your list of manuals |
Page 1 highlights
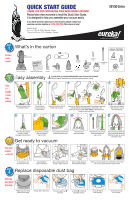
QUICK START GUIDE THANK YOU FOR PURCHASING YOUR NEW EUREKA VACUUM! Please take a few moments to read this Quick Start Guide. It is designed to help you assemble your vacuum easily. If you have questions about your new vacuum, please contact our customer service helpline at 1-800-282-2886. We're here to help! Helpline Hours: 8 a.m. to 7:30 p.m. (CST), Monday - Friday 10 a.m. to 6:30 p.m. (CST), Saturday - Sunday AS1050 Series 1STEP No screws or tools required! 2STEP Follow 1-11 in order to ensure proper assembly. What's in the carton WAND SPECIAL FEATURES 1 Available on some models Bag compartment OWNER'S GUIDE Hose Dusting brush Crevice tool WAND 2 Hose release wand Turbo nozzle Turbo cover Vacuum cleaner Important safeguards Handle Carry handle Extra belt Turbo holder Lower hose retainer Upper hose retainer Stair Hose Easy assembly ! PLEASE READ ALL INSTRUCTIONS BEFORE USING THIS VACUUM CLEANER. Moving parts! Assemble the vacuum cleaner before using. 1 2 3 4 5 C Lock! B Snap! D A Snap! Remove bag compartment to assemble vacuum. 6 Place handle on vacuum; push down to snap in place. 7 Slide carry handle into back of handle. Snap into place. 8 Insert top tab A turbo holder into handle. Place thumbs on each side and snap bottom corners B into place. Turn C knob to lock. Store turbo nozzle in holder. Some models: Snap D turbo cover straight on from front to back. 9 10 Place lower hose retainer in slots on back of vacuum. Push down past rib. 11 WAND 1 3STEP Place upper hose retainer on back of handle. Push up to snap into place. To install hose connector, align tab at right and snap on at left. Pull out bottom of lower hose retainer and position hose. Get ready to vacuum Power switch is marked TOOLS FLOORS I for on-off. Place hose over upper hose retainer. Push wand onto end of hose. Place over bottom hook; snap in at top. Push cord into carry handle and upper cord retainer. Wrap cord. Place dust cup back on vacuum. Push back to latch. Air path knob TOOLS FLOORS To vacuum floors, turn air path knob to 'floors.' Adjust height for carpet or bare floors. Step on power switch to turn on; step on again to turn off. Step on handle release to lower handle into position. 4STEP Replace disposable dust bag Attach tool to end of wand. Turn air path knob to 'tools.' Store tools on carry handle and turbo nozzle in holder. Replace bag when indicator turns orange. Replace bag when green indicator turns orange. Pull up latch to open cover. 1 Fold over hygienic flap – and tuck in. 2 Lift handle — and remove disposable dust bag. Line up flat edge to install new bag. Close cover and snap to lock in place.
-
 1
1
 |
 |