Eureka Airspeed ONE Turbo AS2111A Owner's Manual - Page 10
Maintenance
 |
View all Eureka Airspeed ONE Turbo AS2111A manuals
Add to My Manuals
Save this manual to your list of manuals |
Page 10 highlights
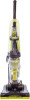
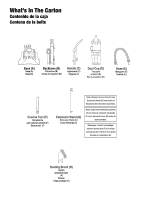
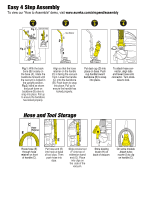
Maintenance Cleaning the Dustcup . Cleaning the Filter Latch Screen Dustcup Hold dust cup handle in one hand and the bottom of dust cup in the other, turn dust cup counter clockwise to unlock the cup from the lid. Empty the dust cup into the trash container. Wipe debris off screen. Hold dust cup handle in one hand and the bottom of dust cup in the other, line up arrow on dust cup with unlock icon on backside of dust cup. Turn clockwise to lock the cup to the lid. Pull dust cup latch to release dust cup. Remove filter and wash. Allow to air dry thoroughly (24 hours) before placing back in dust cup. Scan the QR code to view an instructional video on replacing the dust cup filter. Replacing the Belt Scan the QR code to view an instructional video on washing the dust cup filter Unplug vacuum. Recline cleaner back. Using Philips screwdriver, remove 4 screws from hood. Using thumbs, push down on height adjust knob, while pulling up on inside hood edges with fingers. Lift and remove hood. Lift left side of brushroll out of grooves. Then lift right side of brushroll out of grooves. Remove belt from the brushroll and motor shaft. Loop new belt over motor shaft and brushroll, onto grey belt pulley. Grip the brushroll and belt as shown. Stretch belt and push the right side of brushroll into grooves. Lower left side of brushroll into grooves making sure both sides are secure by pushing down. Rotate the brushroll with hands to make sure belt is in center of gray pulley. Line up corners of hood and put hood tab inside the front of cleaner. From front to back, push hood onto base, keeping hood in base grooves, and line up 4 screw holes. Replace 4 screws. Scan the QR code to view an instructional video on replacing the belt.
-
 1
1 -
2
-
3
-
4
-
 5
5 -
 6
6 -
 7
7 -
 8
8 -
 9
9 -
 10
10 -
 11
11 -
 12
12 -
 13
13 -
 14
14 -
 15
15 -
16
 |
 |
