Eureka Powerline 4773AZ Quick Start Guide - Page 1
Eureka Powerline 4773AZ Manual
 |
View all Eureka Powerline 4773AZ manuals
Add to My Manuals
Save this manual to your list of manuals |
Page 1 highlights
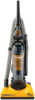
4770 Series QUICK START GUIDE Thank you for purchasing your new Eureka vacuum! Important instructions For easy assembly, please take a few moments to read this Quick Start Guide. If you have questions about your new vacuum, please contact our customer service helpline at 1-800-282-2886. We're here to help! www.eureka.com Helpline Hours: 8 a.m. to 7:30 p.m. (CST), Monday - Friday 10 a.m. to 6:30 p.m. (CST), Saturday - Sunday 1STEP What's in the carton OWNER'S GUIDE Hose REGISTRATION Dusting brush retainer Tool caddy Hose Important safeguards SPECIAL FEATURES Available on some models Duster chamber 2STEP Vacuum base Handle with 2 long and 5 short screws turbo nozzle Dust cup Vacuum back and filter and base hose Extension wand and crevice tool Self-cleaning duster Stair hose Easy assembly ! READ ALL INSTRUCTIONS BEFORE USING THIS VACUUM CLEANER. Moving parts! Assemble the vacuum cleaner before using. Slide vacuum back onto base. Fasten with one long screw. Push end of base hose into opening on vacuum base. Slide tool caddy onto back. Fasten with two short screws. Slide handle onto tool caddy. Fasten with one long screw. Use Phillips and flat-head screwdrivers. Attach hose to vacuum back. Attach hose retainer with one Fasten with two short screws. short screw. Pull retainer out to position hose. Pull up cord and push into lower cord retainer. Push cord into upper cord retainer. Place hose over hose hook on handle. Some models: Secure bottom of Push end of hose into duster duster chamber to hose retainer. chamber. Place duster in Tighten with flat-head screwdriver. chamber and snap into place. Place dust cup on base and snap into place. Wrap cord. Place wand/crevice tool in holder on side of vacuum. 3STEP Place dusting brush on back of handle. Snap turbo nozzle into clip on front. Get ready to vacuum For accessories: Loosen lower end of hose from vacuum and attach tool. Step on power switch to turn on; step on again to turn off. Step on handle release to lower handle into position. If vacuum is hard to push, raise carpet setting. Lift latch to remove dust cup. Empty after each use. PROBLEM SOLVING Refer to Owner's Guide. MAINTENANCE SCHEDULE Refer to back of dust cup or Owner's Guide.
-
 1
1
 |
 |
