Eureka Quick Up 2in1 Cordless 96JZ Owners Guide - Page 5
Identify Parts, HOW TO ASSEMBLE, Attach Handle Grip, Attach Handle - model
 |
View all Eureka Quick Up 2in1 Cordless 96JZ manuals
Add to My Manuals
Save this manual to your list of manuals |
Page 5 highlights
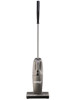
Identify Parts NOTE: The charger and the wall bracket are in the packing material of the shipping carton. 9 1. On/Off Switch 2. Dust Cup Latch 3. Battery Pack 4. Dust Cup 5. Motor Filter 6. Handle Grip 7. Handle 8. Handle Bolt 9. Wall Bracket/Counter Bracket 10. Charge Light for unit 11. Charge Light for extra battery 12. Charger Plug 10 11 12 8 6 7 3 1 (on back of cleaner) 2 4 5 (inside dust cup) HOW TO ASSEMBLE Assemble completely and charge batteries for 14-16 hours before using. Caution: Use only Eureka charger model 351-U-1025-1A Attach Handle Grip ᮢ 1. Locate the 2-part bolt in the assembly package. 2. Align the hole and secure with the 2-part bolt, see Detail A. Tighten the screws. Detail A Lock Button Attach Handle 1. Use your thumb to pull back on the lock button. 2. Push handle into top of cleaner. 3. Release lock button and rotate handle until it locks into place. ᮢ 5
-
 1
1 -
 2
2 -
 3
3 -
 4
4 -
 5
5 -
 6
6 -
 7
7 -
 8
8 -
 9
9 -
 10
10 -
 11
11 -
12
 |
 |
