Eureka Quick Up Cordless 96F Owners Guide - Page 10
How To Assemble, How To Use
 |
View all Eureka Quick Up Cordless 96F manuals
Add to My Manuals
Save this manual to your list of manuals |
Page 10 highlights
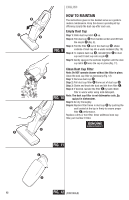
●O ●N Off Floors Carpets ENGLISH ●I HOW TO ASSEMBLE (continued) ●J ●K FIG. 5 Charge the Batteries Note: Charge the batteries for 14-16 hours before initial use. A cleaner may lose charge in shipment. The charger plug will become warm, however, this is not a cause for concern. Note: If the batteries are completely void of charge, the charging light may not shine until there is sufficient charge in the batteries to provide power. Step 1: Turn the nozzle ●O down and lower the cleaner onto the bracket ●I (Fig. 5) or remove the battery from the cleaner and place battery in charging stand. Step 2: When the charge light ●J or ●K lights up it indicates that the battery in the unit and/or an extra battery is charging. It is all right to leave the cleaner on constant charge so it is always ready to use. Unplug only if it will not be in use for several weeks at a time. Note: You can charge a battery in the unit and an extra battery (optional) at the same time. ●G ●M HOW TO USE FIG. 6 Power Switch Note: On initial use, the clear plastic shipping switch lock must be removed to activate the switch. Pull on tab to remove. Step 1: Push the power switch ●N down to turn on; push up to turn off. Step 2: Select type of cleaning. Carpet cleaning starts the brush roll turning. Bare floor cleaning stops the brush roll (Fig. 6). Step 3: To use on bare floors or area rugs, make sure that handle ●G is attached to the cleaner body (Fig. 7). Step 4: To use as a handvac remove handle ●G by releasing the lock button ●M (Fig. 8). FIG. 7 10 FIG. 8
-
 1
1 -
2
-
3
-
4
-
 5
5 -
 6
6 -
 7
7 -
 8
8 -
 9
9 -
 10
10 -
 11
11 -
 12
12 -
 13
13 -
 14
14 -
 15
15 -
16
-
17
-
18
-
19
-
20
-
21
-
22
-
23
-
24
 |
 |
