Fender GB Hot Rod Deluxe Owners Manual - Page 7
Preamp Out / Power Amp
 |
View all Fender GB Hot Rod Deluxe manuals
Add to My Manuals
Save this manual to your list of manuals |
Page 7 highlights
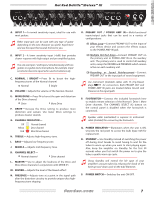
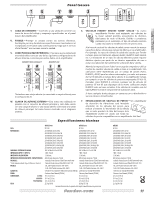
Hot Rod DeVille™/Deluxe™ III INPUTS 1 2 VOLUME DRIVE 56 78 4 9 56 78 4 9 3 2 NORMAL 1 BRIGHT 10 3 11 2 12 MORE 1 DRIVE 10 11 12 TREBLE 56 78 4 9 BASS 56 78 4 9 MIDDLE 56 78 4 9 MASTER 56 78 4 9 REVERB 56 78 4 9 PRESENCE 56 78 PREAMP POWER OUT AMP IN 4 9 3 10 3 10 3 10 3 10 3 10 3 10 2 11 2 11 2 11 2 11 2 11 2 11 1 12 1 12 1 12 CHANNEL 1 12 1 12 1 12 SELECT FOOT SWITCH ON ON STANDBY OFF A. INPUT 1 - A normal sensitivity input, ideal for use with most guitars. ♫ Either input jack can be used with any type of guitar depending on the tone character you prefer. Experiment and use the input that sounds the best to you. B. INPUT 2 - A lower sensitivity input (-6dB) that provides cleaner response with high-output and pre-amplified guitars. ♫ You can use Input 1 and Input 2 simultaneously with two guitars or a guitar and a microphone, for example. Input sensitivities become equal when used simultaneously. C. NORMAL / BRIGHT - Press IN to boost the highfrequency tones of the Normal channel. Normal Bright D. VOLUME - Adjusts the volume of the Normal channel. E. MORE DRIVE - Press IN to boost the gain and distortion of the Drive channel. Drive More Drive F. DRIVE - Increase the Drive setting to produce more distortion and sustain. Use lower Drive settings to produce cleaner sounds. G. CHANNEL INDICATOR - Off J Normal channel YellowÑJÒDrive channel RedÑJÒMore Drive channel H. TREBLE - Adjusts high-frequency tone. I. BASS - Adjusts low-frequency tone. J. MIDDLE - Adjusts mid-frequency tone. K. CHANNEL SELECT - Normal channel Drive channel L. MASTER - Use to adjust the loudness of the Drive and More Drive channels in conjunction with DRIVE {F}. M. REVERB - Adjusts the level of the Reverb effect. N. PRESENCE - Adjusts tone at a point in the signal path after the distortion circuitry to provide unique ultra highfrequency tone shaping. O. PREAMP OUT / POWER AMP IN - Multi-functional input/output jacks that can be used in a variety of configurations: (1) Effects Loop-Connect PREAMP OUT to the input of your effects device and connect the effects output to the POWER AMP IN jack. (2) Multiple Hot Rod Amps-Connect PREAMP OUT on the primary unit to POWER AMP IN on the auxiliary unit. The primary unit is used to control all auxiliary units, except for REVERB and PRESENCE which remain active on each auxiliary unit. (3) Recording or Sound Reinforcement-Connect PREAMP OUT to the input jack of sound equipment. ♫ Use instrument (shielded) cables with TS (Tip-Sleeve) plugs for connections. Both PREAMP OUT and POWER AMP IN jacks are located before Reverb and Presence in the signal path. P. FOOTSWITCH - Connect the included footswitch here to enable remote selection of the Normal / Drive / More Drive channels. The CHANNEL SELECT {K} button on the control panel is disabled when the footswitch is connected. ♫ Speaker cable (unshielded) is superior to instrument cable (shielded) for connecting the footswitch. Q. POWER INDICATOR - Illuminates when the unit is ON. Unscrew the red jewel to access the bulb (type T47) for replacement. R. STANDBY - Use Standby instead of switching the power off during short breaks to avoid having to wait for the tubes to warm up when you want to start playing again. Also, keep the amplifier on Standby for the first 30 seconds when you first switch the power on to give the tubes a gentle warm up cycle. ♫ Using Standby will extend the life span of your amplifier's vacuum tubes by reducing the shock of the heat-up/cool-down cycle on the tube filaments. S. POWER SWITCH - Switches the unit ON/OFF. f e n d e r. c o m 7
-
 1
1 -
 2
2 -
 3
3 -
 4
4 -
 5
5 -
 6
6 -
 7
7 -
 8
8 -
 9
9 -
 10
10 -
 11
11 -
 12
12 -
13
-
14
-
15
-
16
-
17
-
18
-
19
-
20
-
21
-
22
-
23
-
24
-
25
-
26
-
27
-
28
 |
 |
