Fluke VR1710 FE VR1710 Users Manual - Page 14
Connecting the Recorder for the First Time, Adjusting Recorder Settings with Power Log - firmware
 |
View all Fluke VR1710 manuals
Add to My Manuals
Save this manual to your list of manuals |
Page 14 highlights
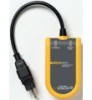
VR1710 Users Manual Connecting the Recorder for the First Time The Recorder plugs into a standard power outlet and connects to a PC via the included USB cable. It should be placed where it can be easily unplugged. Use the proper adapter (included) for your country's power type. 1. Plug the Recorder power cable into the power outlet. Note Do not run Power Log until the recorder is installed and the recorder is plugged in and connected to the PC. Power Log will not recognize the Recorder if launched before the Recorder is connected. 2. Connect the Recorder to the PC with the USB cable. 3. When the Recorder is connected to the PC for the first time, Windows finds the Recorder and the Windows New Hardware Wizard appears. To complete installation, follow these steps: 1. Select the Install the software automatically (Recommended) option by clicking Next. 2. Click Finish. For the latest Recorder firmware, see Firmware Updates. Adjusting Recorder Settings with Power Log Before using the Recorder to collect data, desired variables must be set in the Recorder with Power Log. To set these values: 1. Connect the Recorder to the PC. 2. Launch Power Log. Note that the Select Serial Port menu shows Fluke VR1710. If it is not showing, click the right arrow on the list and scroll down to it. If Fluke VR1710 does not appear in the list, leave the Recorder connected and close, then re-open Power Log. Fluke VR1710 should now appear in the list. Figure 2. Power Log Drop Down List fbx001.bmp 6
-
 1
1 -
2
-
3
-
4
-
5
-
6
-
7
-
8
-
 9
9 -
 10
10 -
 11
11 -
 12
12 -
 13
13 -
 14
14 -
 15
15 -
 16
16 -
 17
17 -
 18
18
 |
 |
