Foxconn B75M User manual - Page 75
Intel Matrix Storage Manager, The topic will be introduced, Steps to Install Serial ATA Hard Disks
 |
View all Foxconn B75M manuals
Add to My Manuals
Save this manual to your list of manuals |
Page 75 highlights
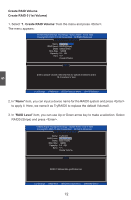
5 CAUTION Intel® Matrix Storage Manager The Intel® Matrix Storage Manager technology supports RAID 0 ,RAID 1, RAID 5, and RAID 10 (0+1) functions. It allows you to get high performance with fault tolerance, big capacity, or data safety provided by different RAID functions. In this section, we will use four SATA hard disks as an example to guide you how to configure your RAID system. There are two 149.0GBs and two 74.5GBs. A creation of second volume will also be well described. In each screen, there is also a message bar about each key's function, such as , , ...etc. it is to help making your selection easier. The topic will be introduced : Installing a new Windows XP in a brand new RAID system. ! Before installing the SATA hard disks, make sure to turn off the computer and unplug the power cord from the power outlet to prevent damage to the hardware. Steps to Install Serial ATA Hard Disks : 1. Install SATA hard disks into the drive bays. 2. Connect one end of the SATA cable to motherboard's SATA connector, and the other end to SATA hard disk. 3. Connect SATA power cable to the power connector of SATA hard disk. WARNING! ■ Both AHCI and RAID modes need to install Intel® Matrix Storage Manager driver. ■ Set SATA mode in BIOS to AHCI, you can skip RAID BIOS creation steps, but the software driver installation of Intel® Matrix Storage Manager shall follow the same rule as described for RAID. 68
-
 1
1 -
2
-
3
-
4
-
5
-
6
-
7
-
8
-
9
-
10
-
11
-
12
-
13
-
14
-
15
-
16
-
17
-
18
-
19
-
20
-
21
-
22
-
23
-
24
-
25
-
26
-
27
-
28
-
29
-
30
-
31
-
32
-
33
-
34
-
35
-
36
-
37
-
38
-
39
-
40
-
41
-
42
-
43
-
44
-
45
-
46
-
47
-
48
-
49
-
50
-
51
-
52
-
53
-
54
-
55
-
56
-
57
-
58
-
59
-
60
-
61
-
62
-
63
-
64
-
65
-
66
-
67
-
68
-
69
-
 70
70 -
 71
71 -
 72
72 -
 73
73 -
 74
74 -
 75
75 -
 76
76 -
 77
77 -
 78
78 -
 79
79 -
 80
80 -
81
-
82
-
83
-
84
-
85
-
86
-
87
-
88
-
89
-
90
-
91
-
92
-
93
-
94
-
95
-
96
-
97
-
98
-
99
-
100
-
101
-
102
-
103
-
104
-
105
-
106
-
107
 |
 |
