Foxconn H77MXV-D User manual - Page 92
Delete RAID Volume
 |
View all Foxconn H77MXV-D manuals
Add to My Manuals
Save this manual to your list of manuals |
Page 92 highlights
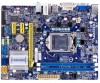
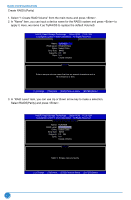
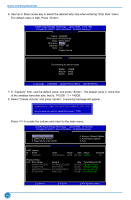
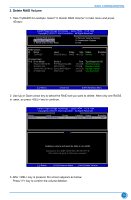
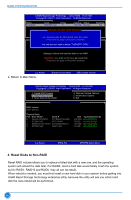
3. Delete RAID Volume RAID CONFIGURATION 1. Take TryRAID5 for example. Select "2. Delete RAID Volume" in main menu and press . Intel(IRn)teMl(aRt)riRx aSptoidraSgteorMagaenaTgeecrhnoopltoiogny R -O UMpvti5o.n0.R0O.1M01-11I1C.H0.98R.12w0R4A I D 5 Copyright(C) 2003-1014 IInntteell CCoorrppoorraattiioonn. A lAl lRl RigihgthstsRReseesrevrevde.d. [ MAIN MENU ] 1. Create RAID Volume 4. Recover Volume Options 2. Delete RAID Volume 5. Acceleration Options 3. Reset Disks to Non-RAID 6. Exit [ DISK /VOLU ME INF ORMATION ] RAID Volume : ID Name Level Stripe Size 0 TryRAID5 RAID5(Parity) 64KB 149.1GB Status Normal Bootable Yes Physical Disks: Port Drive Model Serial # 0 Hitachi HDS72161 PVF904Z21G2JZM 1 ST380811AS 5PS1TAGW 2 SAMSUNG HD161HJ S0V3J9APA30524 3 ST380815AS 5RW1CA37 Size 149.0GB 74.5GB 149.0GB 74.5GB Type/Status(Vol ID) Member Disk(0) Member Disk(0) Member Disk(0) Non-RAID Disk Select ESC]-Exit ENTER]-Select Menu 2. Use Up or Down arrow key to select the RAID set you want to delete. Here only one RAID5 is seen, so press key to continue. Intel(RIn)teMl(aRt)rixRaSptoidraSgteorMagaenaTgeecrhnoopltoiogny R -O UMpvti5o.n0.R0O.1M01-11I1C.H0.98R.12w0R4A I D 5 Copyright(C) 2003-1014 IInntteell CCoorrppoorraattiioonn. A lAl lRl RigihgthstsRReseesrevrevde.d. [ DELETE VOLUME MENU ] Name Level Drives Capacity Status Bootable TryRAID05 RIDA0I(DS5tr(iPpaer)i t y 32 144695.18GB Normal Yes [ HELP ] Deleting a volume will reset the disks to non-RAID. WARNING: ALL DISK DATA WILL BE DELETED. (This does not apply to Recovery volumes) Select ESC]-Previous Menu [DEL]-Delete Volume 3. After key is pressed, the screen appears as below: Press key to confirm the volume deletion. 85
-
 1
1 -
2
-
3
-
4
-
5
-
6
-
7
-
8
-
9
-
10
-
11
-
12
-
13
-
14
-
15
-
16
-
17
-
18
-
19
-
20
-
21
-
22
-
23
-
24
-
25
-
26
-
27
-
28
-
29
-
30
-
31
-
32
-
33
-
34
-
35
-
36
-
37
-
38
-
39
-
40
-
41
-
42
-
43
-
44
-
45
-
46
-
47
-
48
-
49
-
50
-
51
-
52
-
53
-
54
-
55
-
56
-
57
-
58
-
59
-
60
-
61
-
62
-
63
-
64
-
65
-
66
-
67
-
68
-
69
-
70
-
71
-
72
-
73
-
74
-
75
-
76
-
77
-
78
-
79
-
80
-
81
-
82
-
83
-
84
-
85
-
86
-
 87
87 -
 88
88 -
 89
89 -
 90
90 -
 91
91 -
 92
92 -
 93
93 -
 94
94 -
 95
95 -
 96
96 -
 97
97 -
98
-
99
-
100
-
101
-
102
-
103
 |
 |