Frigidaire FAH12ER2T Installation Instructions - Page 9
White-Westinghouse/Frigidaire, Carrier 52F Series
 |
UPC - 012505272004
View all Frigidaire FAH12ER2T manuals
Add to My Manuals
Save this manual to your list of manuals |
Page 9 highlights
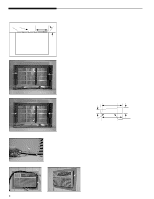
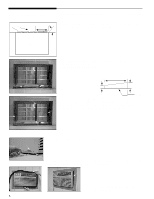
Wall Sleeve Brands: 1 ← 2 91⁄2 → #8 White-Westinghouse/Frigidaire/ 16"+ 171⁄2"Deep Carrier (52F Series) 1. If the wall sleeve does not have a rear grille or louvered panel, install the plastic grille panel from the kit. The plastic grille panel is mounted to the inside of the wall sleeve at the rear flanges. There are (4) plastic nuts in the flanges of the wall sleeve. If your sleeve is missing these nuts or they are damaged. Replacement nuts and grille mounting screws are supplied with the kit. The nuts are installed from the inside of the sleeve and are pressed into the square holes of the rear flanges. Place the grille against the rear flanges and use the (4) washer screws to secure the grille to the sleeve. 2. Cut and attach the (1) 11⁄2"x 3/8"x 261⁄2"long seal to 251⁄2"long. Attach (2) 11⁄2"x 3/8"x 14"long seals as shown. To attach the seals remove the backing paper from the seal. Do not touch adhesive. Press seals firmly in place. 3. Attach 1"x 3/4"x 14"long seal to the inside of the grille panel as shown in the illustration. 2 2 3 4. Install the new unit into the wall sleeve. Attach the ground wire to the unit as shown. 4 5. Install the 1"x 11⁄2"x 84"long stuffer seal between the wall sleeve and the unit. A flat bladed screwdriver or putty knife is recommended. 5 5 6. Assemble and install the Trim Frame. (see Trim Frame) 9
-
 1
1 -
2
-
3
-
 4
4 -
 5
5 -
 6
6 -
 7
7 -
 8
8 -
 9
9 -
 10
10 -
 11
11
 |
 |
