Frigidaire FAH14ER2T Installation Instructions - Page 1
Frigidaire FAH14ER2T - 14,000-BTU Through-the-Wall Air Conditioner Manual
 |
UPC - 012505272011
View all Frigidaire FAH14ER2T manuals
Add to My Manuals
Save this manual to your list of manuals |
Page 1 highlights
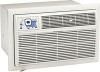
Installation Instructions 14,000 BTU TTW Do This First (for existing sleeve) Note that the air conditioner dimensions are: 24"wide, 141⁄2"high, and 22" deep (without front). Install Air Conditioner according to these installation instructions to achieve the best performance. Save these installation instructions for future reference. CAUTION: When installation is complete, replacement unit MUST have a rearward slope as shown. Wall Sleeve 1/4" to 5/16" UNIT REAR FRONT LEVEL Items in Kit You may not need all parts in the kit. Discard unused parts. Qty. Tapered Spacer Blocks 17"Long 2 Centering/Support Blocks 41⁄2"x 31⁄2"x 11⁄2" 2 Plastic Divider 1/8" x 41⁄2"x 141⁄2" 1 Stuffer Seal 1"x 11⁄2 "x 84" 1 Seal 11⁄2"x 11⁄2"x 25" 2 Seal 11⁄2"x 11⁄2"x 14" 2 Seal 11⁄2"x 3/8"x 25" 2 Seal 11⁄2"x 3/8"x 14" 2 Seal 1" x 3/4"x 14" 1 Trim Frame (side legs) 2 Trim Frame (top & bottom legs) 2 Ground Wire (green) 1 Nut for grounding screw 1 Grounding Screw 1 Grille (plastic) 1 Grille Aluminum 1 Nuts (plastic) 4 Screw w/washer 4 2. Remove old Air Conditioner from wall sleeve and prepare wall sleeve as follows: - Clean interior (do not disturb seals). - Wall sleeve must be securely fastened in wall before installing Air Conditioner. Drive more nails or screws through sleeve, into wall, if needed. - Repair paint if needed. 3. If not existing, drill a 3/16"clearance hole for grounding screw through left side of wall sleeve, in a clear area about 3 inches maximum (to suit) back from front edge of sleeve as shown below. Next attach ground wire inside sleeve, using grounding screw, nut washer pull loose end of ground wire out front of sleeve, and temporarily bend it down and around lower edge of sleeve. 3" Max. Wall sleeve to unit sleeve grounding 1" 3/16" Hole How to Install 1. Identify the wall-sleeve brand for your installation, from the chart below. Brand Wall Sleeve Dimensions (inches) Width Height Depth } White-Westinghouse Frigidaire 251⁄2 151⁄4 Carrier (52F Series) General Electric/ 16, 171⁄2 or 22 Hotpoint 26 155⁄8 167⁄8 Whirlpool 257⁄8 161⁄2 171⁄8 or 23 Fedders/Emerson 27 163⁄4 163⁄4 or 193⁄4 Sears/Kenmore 253⁄4 167⁄8 185⁄8 Emerson/Fedders 263⁄4 153⁄4 15 Carrier (51S Series) 253⁄4 167⁄8 185⁄8 Friedrich 27 163⁄4 163⁄4 NOTE: All wall sleeves used to mount the new Air Conditioner must be in sound structural condition and have a rear grille that securely attaches to sleeve, or rear flange that serves as a stop for the Air Conditioner. 4. Prepare the wall sleeve for installation of the new unit per the following Brand instructions. #1 Emerson 15"Deep #2 Fedders 193⁄4"Deep #3 Fedders or Friedrich 163⁄4"Deep #4 General Electric/Hotpoint 167⁄8"Deep #5 Sears or Carrier (51S Series) 185⁄8"Deep #6 Whirlpool 171 ⁄8"Deep #7 Whirlpool 23"Deep #8 White-Westinghouse/Frigidaire/ 16"+ 171⁄2"Deep Carrier (52F Series) #9 White-Westinghouse/Frigidaire 22"Deep 5. Install new unit into wall sleeve. 6. To attach ground wire to the new unit, remove the screw from the left side front. 7. Assemble and install the Trim Frame (see instruction). 1 P/N 66121624
-
 1
1 -
 2
2 -
 3
3 -
 4
4 -
 5
5 -
 6
6 -
 7
7 -
8
-
9
-
10
-
11
-
12
 |
 |
