Frigidaire FAK104R1V Installation Instructions - Page 4
Caution - installation
 |
UPC - 012505272035
View all Frigidaire FAK104R1V manuals
Add to My Manuals
Save this manual to your list of manuals |
Page 4 highlights
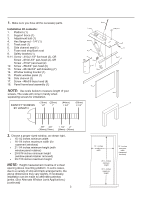
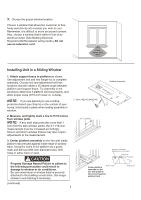
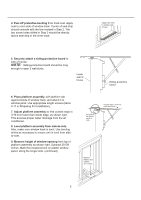
3. Choose the proper window location. Choose a window that allows the cooled air to flow freely and directly into room(s) you wish to cool. Remember, it is difficult to move air around corners. Also, choose a window that is within 6 feet of an electrical outlet. (See Meeting Electrical Requirements/Receptacle wiring needs.) Do not use an extension cord. 6 foot power cord reach Installing Unit in a Sliding Window 1. Attach support brace to platform as shown. Use adjustment bolt and hex flange nut to complete assembly. Choose slot and adjustment bolt hole locations that will create a 45 degree angle between platform and support brace. Try assembly in the window to determine if platform will rest properly, and allow proper slope (3/16-inch lower on outside). NOTE: If you are planning to use a siding- protection board (see Step 5) on the outside of your house, hold board in place when testing assembly in window. 1/4" (6mm) HEX FLANGE NUT Platform Assembly 2. Measure, and lightly mark a line 8-11/16 inches from window jamb. NOTE: If any sash stop protrudes more than 1 inch from the side window jambs, the 8-11/16-inch measurement must be increased accordingly. Screen and storm window frames may also require adjustments to the measurement. 8 /11 16 inches 3. Center platform assembly on the line with inside platform tab pressed against inside edge of window track. Using the holes in the platform as a guide, mark and drill two 9/64-inch diameter holes. Drill holes in either track or stool. CAUTION Property Damage Hazard-Failure to adhere to the following precaution could result in damage to window or air conditioner. Be sure wood stool or window track is securely attached to the building construction. Use longer screws in sub-framing if necessary. (continued) 4 Alternate screw location (depending on the stool depth) Platform tab Center platform Window track assembly on the line with platform tab pressed against window track Window seal
-
 1
1 -
 2
2 -
 3
3 -
 4
4 -
 5
5 -
 6
6 -
 7
7 -
 8
8 -
 9
9 -
 10
10
 |
 |
