Frigidaire FEB27T7FC User Guide - Page 2
Setting the Clock - wall oven
 |
UPC - 057112092898
View all Frigidaire FEB27T7FC manuals
Add to My Manuals
Save this manual to your list of manuals |
Page 2 highlights
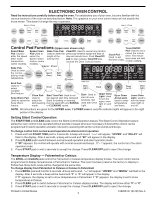
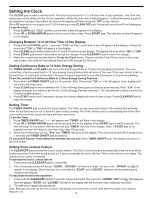
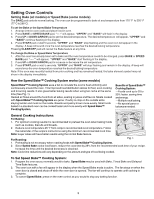
Setting the Clock The CLOCK pad is used to set the clock. The clock may be set for 12 or 24 hour time of day operation. The clock has been preset at the factory for the 12 hour operation. When the wall oven is first plugged in, or when the power supply to the appliance has been interrupted, the timer in the display will flash along with "PF" (power failure). When PF appears in the display and 12:00 is flashing, press CLEAR OFF pad. A beep will sound and PF will disappear. To set the clock 1. Press CLOCK pad. "CLO" and the current time of day will appear in the display. 2. Press UP or DOWN ARROW pad to set the correct time of day. Press START pad. The new time of day will appear in the display. Changing Between 12 or 24 Hour Time of Day Display 1. Press and hold CLOCK pad for 7 seconds. "CLO" and the current time of day will appear in the display. A beep will sound and "12h" or "24h" will appear in the display. 2. Press CLEAN pad to switch between the 12 and 24 hour time of day display. The display will show either "12h" or "24h". 3. Press START pad or wait 5 seconds to accept the change. Press CLEAR/OFF pad to reject the change. 4. Reset the correct time as described in To set the Clock above. Please note that if the 24 hour time of day mode was chosen, the clock will now display time from 0:00 through 23:59 hours. Setting Continuous Bake or 12 Hour Energy Saving The TIMER ON/OFF and CLEAN pads control the Continuous Bake or 12 Hour Energy Saving Features. The oven control has a factory preset built-in 12 Hour Energy Saving feature that will shut off the oven if the oven control is left on for more than 11 hours and 59 minutes. The oven can be programmed to override this feature for Continuous Baking. To set the control for Continuous Bake or 12 Hour Energy Saving Features 1. Press and hold TIMER ON/OFF pad for 10 seconds. After 10 seconds "12h" or "- -h" will appear in the display and the control will beep once. 2. Press CLEAN pad to switch between the 12 Hour Energy Saving and continuous bake features. Note: "12h" in the display indicates the control is set for the 12 Hour Energy Saving mode and "- -h" indicates the control is set for the Continuous Bake feature. 3. Press START pad or wait 5 seconds to accept the change (display will return to time of day). Press CLEAR/OFF pad to reject the change. Setting Timer The TIMER ON/OFF pad controls the Timer feature. The Timer serves as an extra timer in the kitchen that will beep when the set time has run out. It does not start or stop cooking. The Timer feature can be used during any of the other oven control functions, except during a self clean operation. To set the Timer 1. Press TIMER ON/OFF pad. "--:--" will appear and "TIMER" will flash in the display. 2. Press UP or DOWN ARROW pad to set the desired time in the display. Press START pad or wait 5 seconds. The time will begin to countdown with the set time and "TIMER" will stay in the display. Note: If START pad is not pressed the timer will return to the time of day after 25 seconds. 3. When the set time has run out, "End" and "TIMER" will show in the display. The clock will sound with 3 beeps every 7 seconds until TIMER ON/OFF pad is pressed. To cancel the Kitchen Timer before the set time has run out: Press TIMER ON/OFF pad. The display will return to the time of day. Setting Oven Lockout Feature The CLEAR/OFF pad controls the Oven Lockout feature. The Oven Lockout feature automatically locks the oven doors and prevents the Oven from being turned on. It does not disable the clock, Kitchen Timer or the interior oven lights. The ovens can be locked individually. To activate the Oven Lockout feature 1. Press and hold CLEAR/OFF pad for 3 seconds. 2. After 3 seconds a beep will sound, "DOOR", "LOCKED" will flash and "Loc", the oven icon, "UPPER" and will appear in the display. Once the oven door is locked the "DOOR" and "LOCKED" indicator will stop flashing and remain in the display. To reactivate normal oven operation: 1. Press and hold CLEAR/OFF pad for 3 seconds. A beep will sound. The oven icon, "UPPER" "LOC" and will disappear from the display. "DOOR" and "LOCKED" will flash in the display until the oven door has completely unlocked. 2. The wall oven is again fully operational. Note: Because you can set the oven lockout individually, the lower oven can be used when the upper oven lockout feature is on. 2
-
 1
1 -
 2
2 -
 3
3 -
 4
4 -
 5
5 -
 6
6 -
 7
7 -
 8
8
 |
 |
