Frigidaire FFLE1011MW Installation Instructions - Page 18
other joints.
 |
View all Frigidaire FFLE1011MW manuals
Add to My Manuals
Save this manual to your list of manuals |
Page 18 highlights
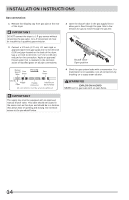
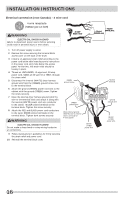
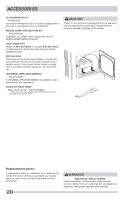
INSTALLATION INSTRUCTIONS Connecting venting 1 Remove the two screws (items A, to the right) securing the dryer front access panel to the dryer cabinet. Lift the panel until the tabs can be disengaged from the cabinet, remove the panel and set aside. 2 Connect the exhaust duct to the outside exhaust system. Use of a 4" (10.2 cm) clamp (item B, to the right) is recommended to connect the dryer to the exhaust vent system. Use metal foil tape to seal all other joints. 3 Reinstall the dryer front access panel. 4 Carefully slide the laundry center to its final position. Recheck for level and rock corners for stability. A A B 18
-
 1
1 -
2
-
3
-
4
-
5
-
6
-
7
-
8
-
9
-
10
-
11
-
12
-
 13
13 -
 14
14 -
 15
15 -
 16
16 -
 17
17 -
 18
18 -
 19
19 -
 20
20 -
 21
21 -
 22
22 -
 23
23 -
24
-
25
-
26
-
27
-
28
-
29
-
30
-
31
-
32
-
33
-
34
-
35
-
36
-
37
-
38
-
39
-
40
-
41
-
42
-
43
-
44
-
45
-
46
-
47
-
48
-
49
-
50
-
51
-
52
-
53
-
54
-
55
-
56
-
57
-
58
-
59
-
60
-
61
-
62
-
63
-
64
 |
 |

18
Connecting venting
1
Remove the two screws (items A, to the right)
securing the dryer front access panel to the
dryer cabinet. Lift the panel until the tabs can be
disengaged from the cabinet, remove the panel and
set aside.
2
Connect the exhaust duct to the outside exhaust
system. Use of a 4” (10.2 cm) clamp (item B, to the
right) is recommended to connect the dryer to the
exhaust vent system. Use metal foil tape to seal all
other joints.
3
Reinstall the dryer front access panel.
4
Carefully slide the laundry center to its
fi
nal
position. Recheck for level and rock corners for
stability.
B
A
A
INSTALLATION INSTRUCTIONS