Frigidaire FFLE3900UW Wiring Diagram - Page 4
Washer Troubleshooting Tests
 |
View all Frigidaire FFLE3900UW manuals
Add to My Manuals
Save this manual to your list of manuals |
Page 4 highlights
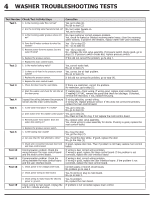
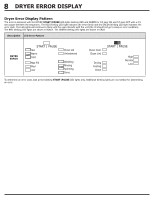
4 WASHER TROUBLESHOOTING TESTS Test Number Check/Test Activity Steps Correction Test 1 1. Is the incoming water flow normal? Yes, go to step (4). No, go to step (2). 2. Are the incoming water faucets turned on? No, turn water faucets on. Yes, go to step (3). 3. Is the incoming water pressure above 20 psi? No, have customer correct pressure problem. Yes, check for kinked or blocked incoming water hoses, clean the incoming water screens. If problem still remains, replace water inlet valve assembly. 4. Does the fill water continue to enter the washer? Yes - Go to step (5) No - Go to step (6) 5. Remove power from the washer. Did the water fill stop? Yes - Go to step (6) No - Replace the inlet valve assembly. If pressure switch checks good, go to step (7). If pressure switch checks bad, replace pressure switch. 6. Replace the pressure sensor. If this did not correct the problem, go to step 7. 7. Replace the main control board. Test 2 1. Is the washer leaking water? Yes, correct water leak. No, go to step (2). 2. Is there an air leak in the pressure sensor Yes, correct the air leak problem. system? No, go to step (3). 3. Replace the pressure sensor. If this did not correct the problem, go to step (4). 4. Replace the main control board. Test 3 1. Check the drain hose for restrictions. If there is a restriction, correct the problem. No restriction, go to step (2). 2. Start the washer and check for 120 VAC at If reading zero, check wiring. If wiring good, replace main control board. the drain pump. If reading 120 VAC, remove the pump and check for blockage. If blocked, remove the restriction, if not, replace the pump. Test 4 Inspect the wiring between the pressure If wiring defective, correct wiring. sensor and the main control board. If wiring OK, replace pressure sensor. If this does not correct the problem, replace the main control board. Test 5 1. Is the water level above 4.5 inches? Yes, go to step (2). No, go to step (4). 2. Does water enter the washer continuously? Yes, go to step (3). No, check air trap for clog, if not replace the main control board. 3. Remove power from washer. Does the water stop coming in? No, replace water valve assembly. Yes, check wiring to valve assembly for shorts. If wiring is good, replace the main control board. 4. Replace the pressure sensor switch. Test 6 1. Is the loading door closed? No, close the door. Yes, go the step (2). 2. Can you hear the lock attempt to close? Yes, check the door strike. If good, replace the door No, go the step (3) 3. Check wire connection between door lock If good, replace door lock. Then if problem is not fixed, replace main control and main control board. board. Test 10 Communication problem. Check the wiring between the main control board and the motor control board. If wiring is bad, correct wiring problem. If wiring is good, replace the main control board. If the problem is not corrected, replace the user interface board Test 11 Communication problem. Check the wiring between the main control board and the user interface board. If wiring is bad, correct wiring problem. If wiring is good, replace the user interface board. If the problem is not corrected, replace the main control board. Test 18 1. Check power in for voltage under load. Correct supply or branch circuit issues. No problem go to step 2 2. Check power wiring to main board. Yes, fix wiring or plug to main board. No, go to step 3. 3. Check wiring to motor board for short to power or ground. Yes, fix problem. No, replace the main board. Test 19 Check wiring to main board. Unplug the If problem is not corrected replace main control. unit for 1 minute and retry.
-
 1
1 -
 2
2 -
 3
3 -
 4
4 -
 5
5 -
 6
6 -
 7
7 -
 8
8 -
 9
9 -
 10
10 -
11
-
12
-
13
-
14
-
15
-
16
-
17
-
18
-
19
-
20
-
21
-
22
-
23
-
24
-
25
-
26
-
27
-
28
 |
 |
