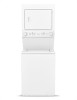
Frigidaire FFLG3900UW Complete Owners Guide - Page 8
STEPS, IMPORTANT, Washer Cycle Selection, Washer, Cycle Settings, Washing Cycle Controls Start, Pause
 |
View all Frigidaire FFLG3900UW manuals
Add to My Manuals
Save this manual to your list of manuals |
Page 8 highlights
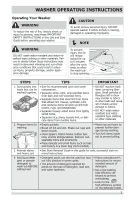
WASHER OPERATING INSTRUCTIONS STEPS TIPS IMPORTANT 5. Add other wash • Water conditioners, detergent boosters, products to wash and enzyme products may be added with tub (if desired). detergent. • See product manufacturer's instructions. 6. Add bleach (if desired) before adding load. • If using liquid bleach, add to bleach • Follow manufacturer's dispenser located in left front corner under instructions for recom- lid. Then add 1 cup (240 ml) water to flush mended amount of dispenser. bleach. • If using powdered bleach, add directly • DO NOT use powdered to the empty tub. bleach in bleach dis- penser. 7. Add laundry load to wash tub. • Add items one at a time, each tightly • DO NOT overload the bunched into its own "ball" to allow benefi- washer. cial item interaction. Avoid loading items in a flat, laid-out fashion. • For best washing performance, dry load level should not be higher than the upper row of holes in the wash tub. • Combine large and small items in a load. Load small items first. Large items should not be more than half the total wash load. • When washing a single heavy item, add 1 or 2 towels to balance the load. 8. Add liquid fabric softener to the final rinse (if desired). • Add diluted fabric softener to the final rinse following fabric softener manufacturer's instructions. • A fabric softener dispensing ball can also be used. • To prevent staining, DO NOT pour liquid fabric softener directly on to wash load. • Use of multi-product (detergent plus softener) sheets or colorabsorbing sheets NOT recommended. They could damage or disable your machine. 9. Select washing cycle and settings for each load. • See Washer Cycle Selection and Washer Cycle Settings on the following pages. • Unit will emit three short beeps to indicate it is in "wake" mode and ready to operate. • For best results, follow fabric care label on items to be washed. 10. Close the washer lid and start the washer. • See Washing Cycle Controls (Start, Pause, and Cancel) on the following pages. • LED will light solid when washer is running. • Pausing a wash cycle while washer is running may affect performance of the wash cycle. 11. Remove items when the cycle is completed. Safety Lid Lock • For your safety, the lid is locked during the • DO NOT force open operation of the washer. the locked lid. • Once cycle has ended, wash tub will come • For safety, the lid will to a complete stop and door lid safety lock remain locked for up to will disengage with an audible double click. 6 minutes. • Place washed items in automatic dryer, line dry, or dry flat as directed by fabric care label. Excess wrinkling, color transfer or odors may develop in items left in the • For best results, follow fabric care label on items to be dried. washer after the cycle has ended. 8
-
 1
1 -
2
-
 3
3 -
 4
4 -
 5
5 -
 6
6 -
 7
7 -
 8
8 -
 9
9 -
 10
10 -
 11
11 -
 12
12 -
 13
13 -
14
-
15
-
16
-
17
-
18
-
19
-
20
-
21
-
22
-
23
-
24
 |
 |
