Frigidaire FFLG3900UW Wiring Diagram - Page 6
Dryer Diagnostic Mode
 |
View all Frigidaire FFLG3900UW manuals
Add to My Manuals
Save this manual to your list of manuals |
Page 6 highlights
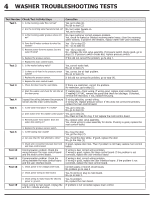
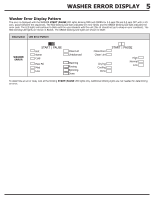
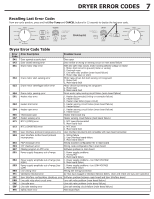
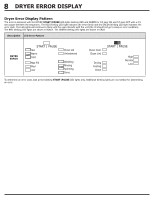
6 DRYER DIAGNOSTIC MODE Dryer Diagnostic Mode Entering Diagnostic Mode: 1. Power OFF the unit by either turning the DRYER cycle selector knob to the CYCLES position (8 o'clock position) or unplugging the unit. 2. Turn ON the unit. 3. Within 10 seconds of powering up, rotate the knob to the Quick Dry position. 4. Press and hold DRY Temp and CANCEL buttons simultaneously until a beep is heard and LED lights start to blink one by one. 5. Press the START|PAUSE button. Exiting Diagnostic Mode: To exit Diagnostic Mode and return to normal function, either press and hold the Dry Temp and CANCEL buttons simultaneously until the LED lights stop blinking or unplug the unit for a 10 full seconds before plugging the unit back in. NOTE The unit will automatically exit Diagnostic Mode and return to normal functionality if left unattended in diagnostic Mode for more than 15 minutes. NOTE Diagnostic Mode Tests If the dryer door has been opened and closed, the START|PAUSE button must be pressed to activate the motor and heater. All tests should be performed with an empty tub. Programs not shown do not have associated tests. DIAGNOSTIC ID PROGRAM TEST/ACTIVATED COMPONENT TEST DESCRIPTION 1 Quick dry Lights/ Buttons test LEDs illuminate in sequence. Manually test buttons for tone. 2 Delicates Motor Motor is driven for 10 mins 3 Activewear Motor, Heater and Thermistor Motor and Heater is driven for 10 mins. 4 Normal - - - - 5 Bulky - - - - 6 Air Fluff - - - - 7 90' - - - - 8 60' - - - - 9 30' - - - - 10 15' Error code history Check last 3 error codes • If START|PAUSE LEDs are not blinking there is no error. • If START|PAUSE LEDs are blinking refer to Dryer Error Codes Table. Understanding Error Codes In Dryer Diagnostic Mode, error codes are indicated by a pattern of blinking RED and GREEN LEDs above the DRYER START|PAUSE button. The LEDs will blink first RED then GREEN, to provide the two digit error code number. These blinking lights can then be translated into error codes that are listed in the chart on the following page and can help pinpoint the problem with the dryer. The number of times a light blinks corresponds with the digit or character it represents. Blinking 1 through 9 times will represent the corresponding digit. Blinking 10 times =A, 11=B, 12=C, 13=D, 14=E, 15=F. An Error Code looks like this: E 4 2 This letter "E" designates The first digit is the area of error. This digit is de- that this is an Error Code. termined by counting how many times the LED over the START|PAUSE button blinks RED. In this example the LED will blink RED four times. Looking at the Dryer Error Code Table on the following page, E42 refSeTrsAtRo Ta D|oPorALUocSkEError. Error Error Description Code Hot Possible Causes Warm The second digit is the type of error. This digit is determined by counting how many times the LED over the START|PAUSE button blinks GREEN. Close Lid Unbalanced Close Door Clean Lint E42 Door closed sensing error Door swCitcohldor wiring or sensing circuit on main board failure START | If • • your The The dryer has multiple errors, the display will communicate up to three error codes. GREEN LED light for Done will be illuminated while theMfairxstFeirllror code is being GREEN LED light for Cooling will be illuminated while Mthedsecond error code is Washing bceoimngmcuonRmicimnatsueinndi.gcated. • The GREEN LED light for Drying will be illuminated while thLeowthird error code is being commSupniincantiendg. Reset Dryer Error Code History in Diagnostic Mode: Done Drying Cooling Done Rotate the dryer cycle selector knob to the 15' position (position 10) and press and hold Dry Temp and CANCEL buttons simultaneously until UI stops displaying error code.
-
 1
1 -
 2
2 -
 3
3 -
 4
4 -
 5
5 -
 6
6 -
 7
7 -
 8
8 -
 9
9 -
 10
10 -
 11
11 -
 12
12 -
13
-
14
-
15
-
16
-
17
-
18
-
19
-
20
-
21
-
22
-
23
-
24
-
25
-
26
-
27
-
28
 |
 |
