Frigidaire FFWC38F6LS Complete Owner's Guide (English) - Page 6
Energy Saving Tips - display
 |
UPC - 012505749193
View all Frigidaire FFWC38F6LS manuals
Add to My Manuals
Save this manual to your list of manuals |
Page 6 highlights
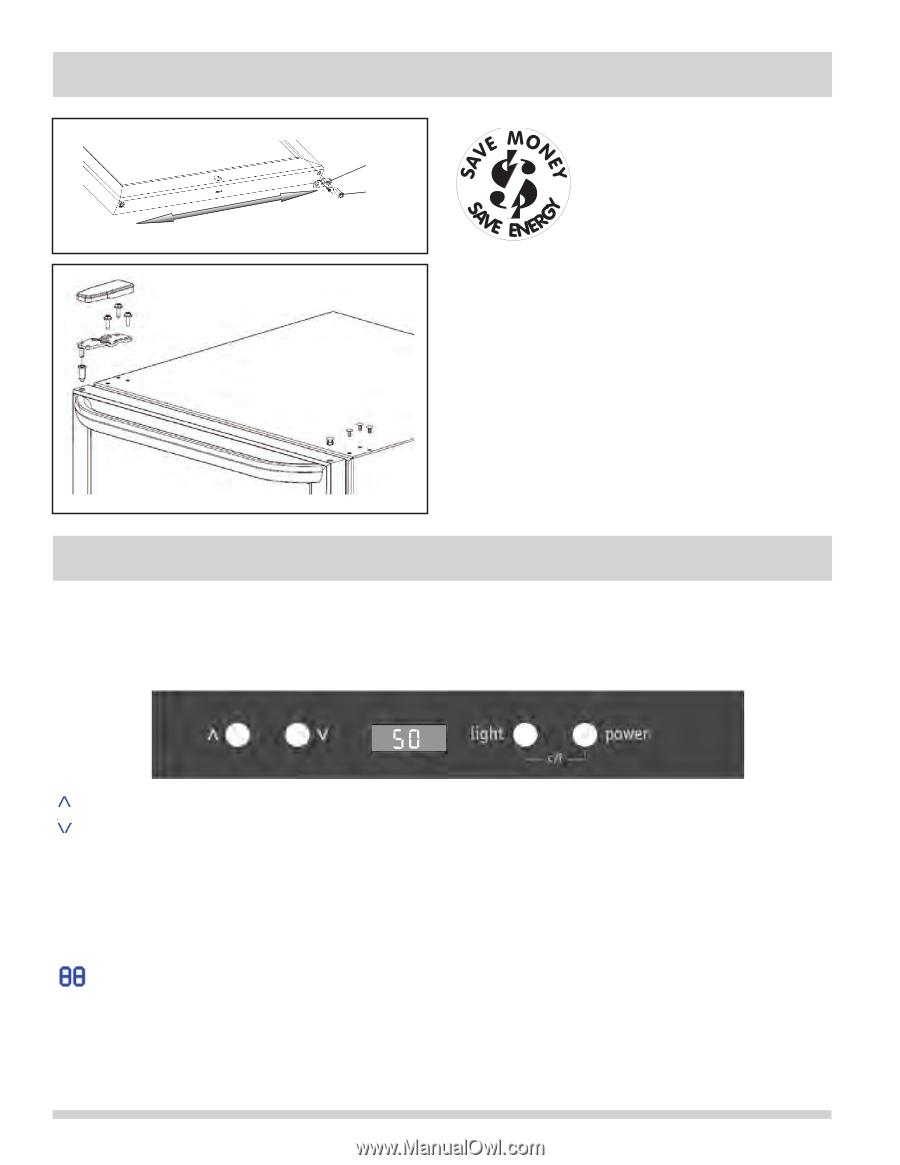
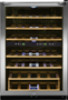
INSTALLATIONChart 2 Step 7:Remove the bolt on the bottom of the door by screwdriver�(see chart 3) Step 8:Remove the screw� and the block �,then set them on the left side.(see chart 3) Stop Ľ bracketľ Bushingļ Fig. 6 Chart 3 and fixSttehpe9to:Cphhainnggeethoen hthinegdeoaoxris,t�o mfroamkethteherigdhotohrolleevteol,lseeftehcohlea(rste8e.chart 4) Step 14:Check the sealing of the door,then refit the parts �ǃ�. ENERGY SAVING TIPS • Install the wine cooler in the coolest part of a dry and ventilated room, out of direct sunlight and away from heating ducts or registers. Do not place the wine cooler next to heat-producing appliances such as a range, oven or dishwasher. • Level the wine cooler so the door close tightly. Fig. 7 Chart 4 Step 10:Use knife to remove the parts�,see chart 5. • Do not over crowd the wine cooler or block cold air Ŀ vents. Doing so causes the wine cooler to run longer and use more energy. Shelves should not be lined with aluminum foil, wax paper or paper toweling. Liners interfere with cold air circulation, making the wine cooler less efficient. - 8 - • Wipe containers dry before placing them in the wine cooler. This cuts down on moisture build-up inside the unit. Chart 8 Placement of Wine Cooler • Organize the wine cooler to reduce door openings. Remove as many items as needed at one time and close the door as soon as possible. TEMPERATURE CONTROLS The wine cooler should be placed in dry and ventilated room. The location of the wine cooler should not be irradiated by direct sunshine. The wine cooler sChooulod lbeDfaor awwany frPomehreiaotindg sources, such as: cooking stove or heating radiator. If the wine cooler has to be placed near heating source, please adopt pFrooprebr heesattinpgeirnfsoulramtioannbcoaer,d afolrloinwsul4atiohnoourrkseefporthtehweinewcinooelercaotoleleasrt to cool down completely. The wine cooler will run continuously tfhoerfotlhloewinfigrmstinsimeuvmedraisltahncoeusrasw.ay from the heating sources: FToer emlectpricestroavet: 3ur.e Control for Single Zone Model For oil oInr cdoaicl satotvioe:n30of.Temperature in Lower Chamber Replac:ePmreenstsofthDiosorbHuitntgoen once and the temperature increase 1°C. The :doPorrheinsgsestohfitshisbwuintetoconoleorncacnebeainntedrchthanegetdebmetwpeeenrathteulerfet adndecrease 1°C. right sides. InstallIantidoincaoftiHoanndolfe Temperature in Upper Chamber 1. Set tPh:erPehsarsneIdstnlehsdiosntichbthaiuesttftiibxooanutniotontoonsfnchaeTfot.tenomcinepcraeenraadsettuhtereemtpienemrLaptouewrreae1tur°rCFe/hCina. cmrebaesre 1°C. : PPrree:sssPs:trhtPehisrsisebsusbttsuhtotittnshooinbsnuocbetntuocttoentodaonencnrodcenaethcseeaentteaedmnmptdhpeeretahrttaeuetrumeter1epm°edpFre/eaCcrt.ruaertauesredee1inc°rCcer.eaasese11°C°C. . : T emTthpheeeIrdnwaedtisuniireceeacdotditooieslmneprlpoaceyfar.naT-teb1u0erm-eopipseerrreaaattceuhdreebdy.inadUjupsptinegr the temperature Chamber control buttons (up arrow and down arrow) until Lig ht : LigThhtein:dgPisbrpeluastytsowntihllfiosflrabsLhuEtfDtoorlnaamofenpwc; eistecacoonnnddtrstohblseeftothereemospenet/orpafoftinoutfreilsaimlnocpckr.eedaisne. 1°C. PowTheer:tOemn:p/PoefrrfaebtsuusrtettorhaninsugbseeuMdttIoNtonatnuodrnnMcoeAnXa/oinsfdf4a1tlh°l el-o6ate4d°m.Fp(5e°ra-t1u8r°eCd)e. crease 1°C. Press Light and Power together for 2 seconds and you can convert between fahrenhe:TitTetmeemmpeppreearrtaauttruuerreedaidsnpidslapCylaeyls.ius temperature. LPLNiogiogwhhttei:trc::TeLhT!ihisgisbhubtitunttogtnonbtsuurttnutosrnntsheftohlriegLhptEowODeNrlaaOnmNdpaO;nFidFt.OcoFFn.trols the on/off of lamp. z tPPPTforaehorcieslehuwssarbseendogrewLt:efhaiiOlbglLuenbhiltgte/wtohteatefthefnmanebdnpuFtdeeaPttPhmrooaroepntwwuneruhereeaesrritetubitsdoaurengttt1doeos0nCet/th'1etsuel0bsrarni°etuCfftsoooh,trnereea/m2sontahpfdmsfeeeaertapclhttlooiuemlwnroeedaetsers.dmf.aapinleudrraeyt.uorue after power can convert between 6 z fTaohreelnohngeaittetemthpeesraetruvirceealnifed Cofelcsoiumsptreemsspoer,raptlueraes.e wait for at least 5 minutes before the wine cooler is restarted after power failure. Notice!
-
 1
1 -
 2
2 -
 3
3 -
 4
4 -
 5
5 -
 6
6 -
 7
7 -
 8
8 -
 9
9 -
 10
10 -
 11
11 -
 12
12
 |
 |