Frigidaire FGMO205KF Complete Owner's Guide (English) - Page 8
Part Names & Control Panel - microwave
 |
UPC - 012505560569
View all Frigidaire FGMO205KF manuals
Add to My Manuals
Save this manual to your list of manuals |
Page 8 highlights
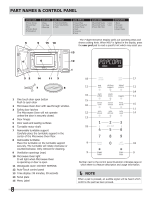
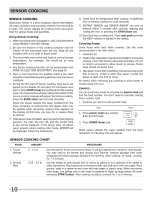
PART NAMES & CONTROL PANEL The 7-digit Interactive Display spells out operating steps and shows cooking hints. When HELP is lighted in the display, press the user pref pad to read a specific hint which may assist you. 1 One touch door open button Push to open door 2 Microwave Oven door with see-through window. 3 Safety door latches The Microwave Oven will not operate unless the door is securely closed. 4 Door hinges 5 Door seals and sealing surfaces 6 Turntable motor shaft 7 Removable turntable support Carefully place the turntable support in the center of the Microwave Oven floor. 8 Removable turntable Place the turntable on the turntable support securely. The turntable will rotate clockwise or counterclockwise. Only remove for cleaning. 9 Ventilation openings (rear) 10 Microwave Oven light It will light when Microwave Oven is operating or door is open. 11 Waveguide cover: DO NOT REMOVE. 12 Auto-Touch control panel 13 Time display: 99 minutes, 99 seconds 14 Serial plate 15 Menu Label 8 18 17 11 11 14 16 11 15 10 15 11 12 14 13 18 9 18 9 9 Number next to the control panel illustration indicates page on which there is a feature description and usage information. NOTE When a pad is pressed, an audible signal will be heard which confirms the pad has been pressed.
-
 1
1 -
2
-
 3
3 -
 4
4 -
 5
5 -
 6
6 -
 7
7 -
 8
8 -
 9
9 -
 10
10 -
 11
11 -
 12
12 -
 13
13 -
14
-
15
-
16
-
17
-
18
-
19
-
20
-
21
 |
 |
