Frigidaire FGRC1244T1 Installation Instructions - Page 3
FIG. 7A, FIG. 8A, A: For wooden windows, B: For Vinyl-Clad windows, FIG. 8B, FIG. 7B, FIG. 9B, Drive - installation
 |
View all Frigidaire FGRC1244T1 manuals
Add to My Manuals
Save this manual to your list of manuals |
Page 3 highlights
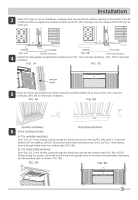
How to Install Installation Keep a firm grip on the air conditioner, carefully place the unit into the window opening so the bottom of the air conditioner frame is against the window sill (FIG. 6A & FIG. 6B). Carefully close the window behind the top rail of the unit. INSIDE FIG. 6A OUTSIDE Wooden Windows INSIDE FIG. 6B OUTSIDE Vinyl-Clad Windows Extend the side panels out against the window frame (FIG. 7A for wooden windows), (FIG. 7B for Vinyl-Clad windows). FIG. 7A FIG. 7B window frame Place the frame lock between the frame extensions and the window sill as shown (FIG. 8A for wooden windows), (FIG. 8B for Vinyl-Clad windows). FIG. 8A FIG. 8B wooden windows: Drive locking screws: Vinyl-Clad windows: A: For wooden windows: Drive 1/2Ǝ (12.7 mm) locking screws through the frame lock and into the sill (FIG. 9A). NOTE:To prevent window sill from splitting, drill 1/8Ǝ (3mm) pilot holes before driving screws. Drive 1/2Ǝ (12.7 mm) locking screws through frame holes into window sash (FIG. 9B). B: For Vinyl-Clad windows: Drive 1/2Ǝ (12.7 mm) locking screws through the frame lock and into the window sash (FIG. 9B). NOTE: Before driving the screws, use a drill to drill 5 holes through the holes in the frame lock and frame extensions into the windows sash as shown ( FIG. 9B). FIG. 9A FIG. 9B 3
-
 1
1 -
 2
2 -
 3
3 -
 4
4 -
 5
5 -
 6
6
 |
 |