Frigidaire FGUN2642LF Complete Owner's Guide (English) - Page 16
AUTOMATIC ICE MAKER, Ice maker operation & care - water dispenser
 |
UPC - 012505698484
View all Frigidaire FGUN2642LF manuals
Add to My Manuals
Save this manual to your list of manuals |
Page 16 highlights
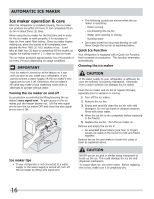
AUTOMATIC ICE MAKER Ice maker operation & care After the refrigerator is installed properly, the ice maker can produce ice within 24 hours. It can completely fill an ice bin in about three (3) days. When using the ice maker for the first time and in order for the ice maker to work properly, it is necessary to clear air from water filter tubing. Once ice maker begins making ice, allow the bucket to fill completely, then discard the first TWO (2) FULL buckets of ice. It will take at least two (2) days to completely fill the bucket on regular ice making mode or 1 1/2 days on fast ice mode. The ice maker produces approximately four (4) pounds of ice every 24 hours depending on usage conditions. IMPORTANT Your ice maker is turned on at the factory so it can work as soon as you install your refrigerator. If you cannot connect a water supply, lift the ice maker's wire signal arm to turn it off. Otherwise, the ice maker's fill valve may make a loud chattering noise when it attempts to operate without water. Turning the ice maker on and off Ice production is controlled by lifting/lowering the ice maker's wire signal arm. To gain access to the ice maker, pull the freezer drawer out. Lift the wire signal arm to turn the ice maker OFF and lower the wire signal arm to turn it ON. • The following sounds are normal when the ice maker is operating: - Motor running - Ice dropping into ice bin - Water valve opening or closing - Running water • Ice cubes stored too long may develop an odd flavor. Empty the ice bin as explained below. Quick Ice Function Your refrigerator is equipped with a Quick Ice Function, that increases ice production. This function terminates automatically. Cleaning the ice maker CAUTION If the water supply to your refrigerator is softened, be sure the softener is properly maintained. Chemicals from a water softener can damage the ice maker. Clean the ice maker and ice bin at regular intervals, especially prior to vacation or moving. 1 Turn off the ice maker. 2 Remove the ice bin. 3 Empty and carefully clean the ice bin with mild detergent. Do not use harsh or abrasive cleaners. Rinse with clean water. 4 Allow the ice bin to dry completely before replacing in the freezer. 5 Replace the ice bin. Turn the ice maker on. Remove and empty the ice bin if: • An extended power failure (one hour or longer) causes ice cubes in the ice bin to melt and freeze together. Remove the ice bin and shake to loosen the cubes or clean as explained above. Ice maker tips • If your refrigerator is not connected to a water supply or the water supply is turned off, turn off the ice maker by lifting wire signal arm. CAUTION NEVER use an ice pick or similar sharp instrument to break up the ice. This could damage the ice bin and dispenser mechanism. To loosen stuck ice, use warm water. Before replacing the ice bin, make sure it is completely dry. 16
-
 1
1 -
2
-
3
-
4
-
5
-
6
-
7
-
8
-
9
-
10
-
 11
11 -
 12
12 -
 13
13 -
 14
14 -
 15
15 -
 16
16 -
 17
17 -
 18
18 -
 19
19 -
 20
20 -
 21
21 -
22
-
23
-
24
-
25
-
26
-
27
-
28
-
29
 |
 |
