Frigidaire FPDC12D7MS Complete Owner's Guide - Page 6
Installing The Water Filter Holder And Carbon Filter
 |
View all Frigidaire FPDC12D7MS manuals
Add to My Manuals
Save this manual to your list of manuals |
Page 6 highlights
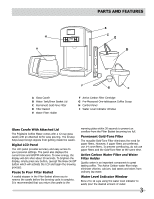
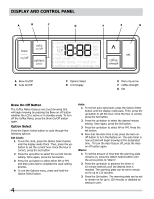
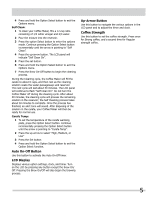
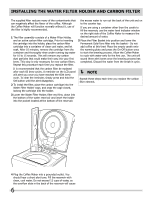
Installing the Water Filter Holder and Carbon Filter The supplied filter reduces many of the contaminants that can negatively affect the flavor of the coffee. Although the Coffee Maker will function normally without it, use of the filter is highly recommended. 1 The filter assembly consists of a Water Filter Holder, and an active carbon filter cartridge. Prior to inserting the cartridge into the holder, place the carbon filter cartridge into a container of clean cool water, and let soak. After 10 minutes, remove the cartridge from the container and thoroughly rinse under running tap water for 10 to 15 seconds. This will remove any carbon dust particles that could make their way into your first brew. This step is only necessary for new carbon filters. Repeat this procedure each time you replace the filter. It is recommended that the carbon filter be replaced after each 60 brew cycles. A reminder on the LCD panel will alert you once you have reached the 60th brew cycle. To clear the reminder, simply press and hold the Set button until the alert disappears. 2 To install the filter, place the carbon cartridge into the Water Filter Holder cage, and snap the cage closed, locking the cartridge into the holder. 3 Lower the Water Filter Holder, filter end first, down into the bottom of the water reservoir and insert the holder into the pocket located at the bottom of the reservoir. the excess water to run out the back of the unit and on to the counter top. If you are using a container other than the carafe to fill the reservoir, use the water level indicator window on the right side of the Coffee Maker to measure the desired amount of water. 5 Place the Filter Basket into position and lower the Permanent Gold-Tone filter into the basket - Do not add coffee at this time! Place the empty carafe onto the warming plate and press the On-Off button once to start the brewing process. Allow the Coffee Maker to cycle with water-only for the first use. The unit will sound three alert tones once the brewing process has completed. Discard the water from the break-in cycle. NOTE Repeat these steps each time you replace the carbon filter element. 4 Plug the Coffee Maker into a grounded outlet. You should hear a short alert tone. Fill the reservoir with clean, cool water. Do not exceed 12 cups of water, as the overflow slots in the back of the reservoir will cause 6
-
 1
1 -
 2
2 -
 3
3 -
 4
4 -
 5
5 -
 6
6 -
 7
7 -
 8
8 -
 9
9
 |
 |
