Frigidaire GLEQ2152EE Operating Instructions - Page 1
Frigidaire GLEQ2152EE - 27" Front-Load Electric Dryer Manual
 |
UPC - 012505375477
View all Frigidaire GLEQ2152EE manuals
Add to My Manuals
Save this manual to your list of manuals |
Page 1 highlights
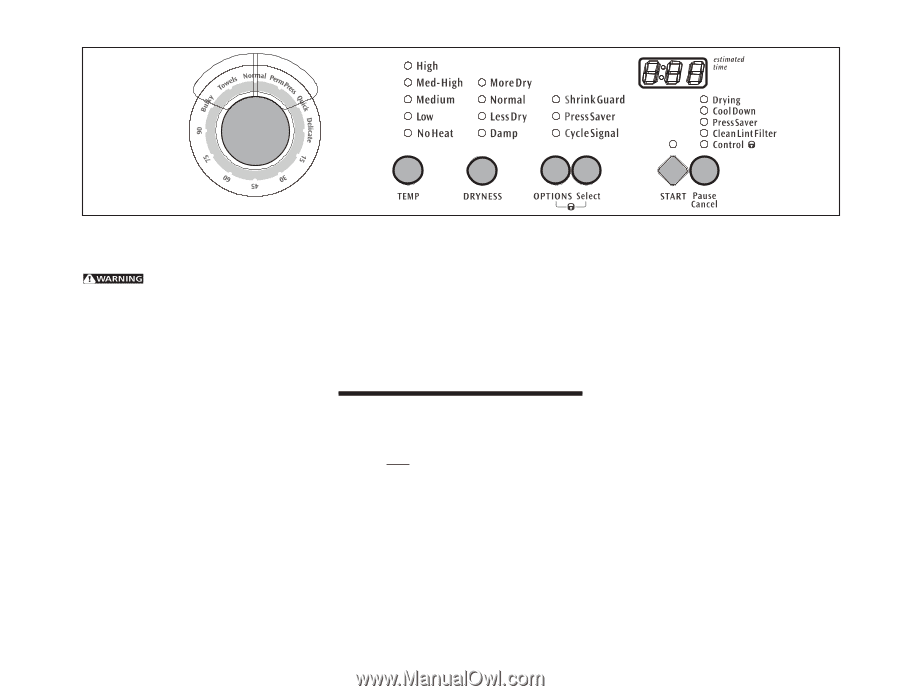
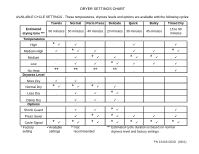
DRYER OPERATING INSTRUCTIONS Before Operating Your Dryer Read your dryer Owner's Guide. It has important safety and warranty information. It also has many suggestions for best drying results. To reduce the risk of fire, electric shock or injury to persons, read the IMPORTANT SAFETY INSTRUCTIONS in your dryer Owner's Guide before operating this appliance. Operating Steps Read "Drying Procedures" in your Owner's Guide. It explains these operating steps in detail. 1. Prepare items for drying. 2. Check that lint filter is clean and in place. 3. Load the dryer. If desired, add a dryer fabric softener sheet. Close the door. 4. Select the appropriate cycle and settings for each load. • Turn the Cycle Selector knob to select the cycle.The estimated drying time will be displayed. • Suitable drying temperature, dryness level and options will automatically be indicated for each cycle. To change the temperature and dryness level, press TEMP and DRYNESS until the desired selections are made. • To select an option, press OPTIONS until the indicator for a desired option flashes and press Select. Follow the same steps to delete an option. • If a dryness level or option is not available for a cycle,it will not light. • Changes made to the cycle will automatically be remembered the next time that cycle is selected. • See the "Dryer Settings Chart" for more details. 5. Press START to begin the cycle. • To pause the cycle or change settings, press Pause/Cancel once. "PAU" will be displayed alternately with the estimated drying time. To resume the cycle, press START. • To stop or change the cycle, press Pause/ Cancel twice. 6. A signal will sound at the end of the cycle and periodically during Press Saver when the Cycle Signal option is selected. When the cycle ends, remove items immediately and hang or fold. 7. Clean the lint filter after every load. The Clean Lint Filter indicator will light at the end of the cycle as a reminder. Cycle Selection Turn the Cycle Selector knob to the desired cycle. For best results, follow the fabric care label instructions on items to be dried. To change the selection after the cycle has begun, press Pause/ Cancel twice, select a new cycle and press START. Just turning the knob to another selection will not change the cycle. The signal will beep and the status lights will flash, but the original cycle will continue. Auto Dry Auto Dry cycles take the guesswork out of drying time. Loads dried using the Towels, Normal, Perm Press and Delicate cycles will dry automatically at the selected temperature to the desired dryness level. The dryer uses sensing bars to sense the moisture level of the load as it tumbles through heated air. Auto Dry cycles save time and energy and protects fabrics. The estimated drying time will be displayed for about 5 minutes. Then the outside of the display will light up in a circular track to indicate the drying time is automatically being determined by the sensors. When the load has reached the selected dryness level, it will continue to tumble, unheated, during a Cool Down period. This helps reduce wrinkling and makes items easier to handle during unloading. The estimated Cool Down time will be displayed. Drying time varies depending on size and dampness of load and fabric type. If the load is too small or almost dry, the sensing bars may not detect enough moisture to continue the cycle and the cycle may end after a few minutes. Select a Timed Dry setting to dry such loads. Room temperature and humidity, type of installation and electrical voltage or gas pressure can also affect drying time. Towels Select this Auto Dry cycle for towel loads. Normal Select this Auto Dry cycle for cotton items. Perm Press Select this Auto Dry cycle for cottons and blends with a no-iron finish. Delicate Select this Auto Dry cycle for knits and delicate items. PN 134431300D (0801)
-
 1
1 -
 2
2 -
 3
3 -
 4
4 -
 5
5 -
 6
6
 |
 |