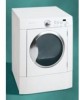
Frigidaire GLEQ2152ES Technical Data Sheet - Page 2
FUNCTION TEST SEQUENCE, Select, Pause, Cancel, START, Drying, Cool Down, More Dry, DRYNESS, OPTION, - no heat
 |
UPC - 012505374036
View all Frigidaire GLEQ2152ES manuals
Add to My Manuals
Save this manual to your list of manuals |
Page 2 highlights
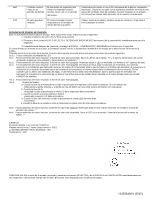
FUNCTION TEST SEQUENCE 1. Position cycle selector to 12 O'clock position. 2. Press and hold Select and Pause Cancel buttons simultaneously for six seconds. 3. Immediately after, press and hold Pause Cancel and START buttons simultaneously for 4 seconds. The control will enter test mode, the buzzer will sound 3 times and all LED'S will rapidly flash. After entering the test mode, the program knob can now be rotated to select the following tests: 12 O'clock: All LED's will flash. 1 O'clock: Drive motor runs; heat source is on. Drying LED is lit. "H" and the control thermistor reading will toggle back and forth in the display.** 2 O'clock: Drive motor runs; heat source is off. Cool Down LED is lit and "AF" (Air Fluff) is displayed. 3 O'clock: Drive motor runs; heat source is off. Drying and Cool Down LED's are lit and numbers appear in the display showing moisture sensor readings. Opening the door (press in on door switch plunger) and placing a finger on the both moisture sense bars at the same time will make the numbers decrease. In controls that do not have a digit display, the More Dry LED should be ON. Opening the door (press in on door switch plunger) and placing a finger on the both moisture sense bars at the same time will make the Damp LED come on. 4 O'clock: Drive motor runs; heat source is off. Key test: a. When the TEMP key is pressed, all the TEMP LED's should light. If the TEMP selector is the rotary knob, and the knob is rotated, there should be a key beep with each setting. b. When the DRYNESS key is pressed, all the dryness level LED's should light. c. When the OPTION or Select key is pressed, all the Option LED's should light. d. When the START key is pressed, all the cycle status LED's should light. e. When the Pause Cancel key is pressed, all the cycle status LED's should light. 5 O'clock: Drive motor runs; heat source is off. Cool Down LED is lit. Control thermistor reading is displayed.** 6 O'clock: Drive motor runs; heat source is on. Drying LED is lit. Control thermistor reading is displayed.** **For models that do not have a digit display, the dryness LED'S are to be used to determine the control thermistor temperature reading. The number of flashes of the bottom three LED'S will determine the value of the temperature as follows. EXAMPLE: Normal flashes 1 time (Normal = HUNDRED'S) Less Dry flashes 2 times (Less Dry = TEN'S) Damp flashes 6 times (Damp = ONE'S Temperature = 126° To EXIT test mode, press and hold the Select and Pause Cancel buttons simultaneously for six seconds or disconnect power from dryer. Dryer will be reset for regular operation. 134509400A (0501)
-
 1
1 -
 2
2 -
 3
3 -
 4
4 -
 5
5 -
 6
6 -
 7
7 -
 8
8
 |
 |
