Fujitsu A1220 A1220 Getting Started Guide - Page 4
Common Indicators - manual
 |
View all Fujitsu A1220 manuals
Add to My Manuals
Save this manual to your list of manuals |
Page 4 highlights
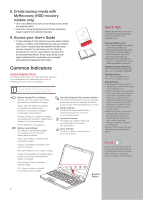
8. Create backup media with myRecovery (HDD recovery models only) • Click on the [MyRecovery] icon to create backup recovery media and application discs. • Look in the "Saving and Recovering Your Factory and System Images" guide for more detailed instructions. 9. Access your User's Guide • To take advantage of all the features of your new Fujitsu LifeBook notebook, it is highly recommended that you read your electronic User's Guide. It contains important detailed information about your new computer. You can access your User's Guide by selecting its icon from the screen desktop. You will need to be connected to the Internet. Or you can go directly to your support website at http://www.fujitsu.com/us/support/ and download the appropriate User's Guide. Common Indicators Status Display Panel The Status Display Panel is located above the keyboard. The indicators are only visible when the unit is on. Following are some common indicators. If the battery pack is installed while the power is turned off, the battery level indicator will display the charge level for five seconds after it blinks orange. Battery Charge/DC-In Indicator Orange, solid: AC adapter and battery are available and system is charging. Green, solid: AC adapter and battery are available and system is fully charged, or AC adapter is plugged in but battery is not installed. Orange, blinking: AC adapter and battery are available and waiting to charge battery (battery is out of thermal range). Off: AC adapter is not plugged in. Battery Level Indicator The Battery Level indicators display the charge level of the indicated battery pack, as follows: Green, solid: Battery is between 51% and 100% charged. Orange, solid: Battery is between 13% and 50% charged. Red, solid: Battery is 12% or less charged. Orange, blinking: Blinks during battery status measurement (Four seconds after the battery is installed). Red, blinking: There is a problem with the battery. Off: There is no battery installed or the battery has no charge. Hard Drive/optical Drive Access Indicator The Hard Drive/Optical Drive Access indicator glows green when your internal hard drive is being accessed. Note that flickering is normal. NumLk Indicator The NumLk indicator states that the integral keyboard is set in ten-key numeric keypad mode. CapsLock Indicator The CapsLock indicator states that your keyboard is set to type in all capital letters. ScrLk Indicator The ScrLk indicator states that your scroll lock is active. Support Button Quick Tips It takes approximately 4 hours to charge a fully discharged single battery with unit off or in suspend mode. optimizing Battery Life • Set power management setting to Maximize Battery Life. • Adjust display brightness levels to lowest comfortable setting. • Utilize Suspend mode when not using your notebook. • Read the Power Management section in your electronic User's Guide for additional features. Adjusting Display Brightness • Fn + F6 to decrease brightness • Fn + F7 to increase brightness Adjusting Volume • Fn + F8 to decrease volume • Fn + F9 to increase volume Support Button • The Support button performs different actions when the system is off or when it is on. • When the system is off, pressing the Support button will open the Fujitsu Start Boot Menu which allows you to select either a Diagnostic Program to test your system or Recovery and Utility to perform a number of other functions, including recovery of your system. • When the system is on and you are logged on, pressing the Support button starts the Fujitsu Support Center utility which offers three tabs: Manual, Diagnostic Program, and Support. See your User's Guide for more information about the Support button. Drivers Look for the latest drivers on the Drivers and Applications Restore CD. Right-click the FDU icon and select "update", or download them at us.fujitsu.com/computers. 4
-
 1
1 -
 2
2 -
 3
3 -
 4
4 -
 5
5 -
 6
6 -
 7
7 -
 8
8 -
 9
9 -
 10
10 -
11
-
12
 |
 |
