Fujitsu FI-6770A Getting Started Guide - Page 11
Flatbed type, Indications on the Function Number Display, Function Number Display, Function] button
 |
UPC - 097564307485
View all Fujitsu FI-6770A manuals
Add to My Manuals
Save this manual to your list of manuals |
Page 11 highlights
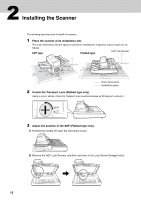
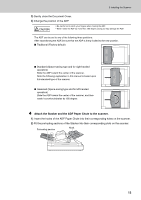
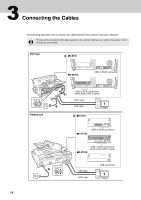
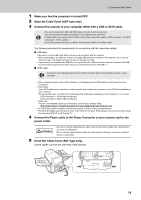
■ Flatbed type 1 Preparation Check Check LED Function Number Display Function [Function] button Send to [Send to] button Scan / Stop [Scan/Stop] button Power [Power] button/Power LED Name Check LED Function Number Display [Function] button [Send to] button [Scan/Stop] button [Power] button/Power LED Description Lights (in orange) when an error occurs. Indicates the scanner status. Switches the function activated by the [Send to] button. Launches linked application software for scanning. Resets an error indication. Launches linked application software for scanning. Resets an error indication. Cancels ongoing scanning. Turns the scanner ON and OFF. Lights (in green) when the scanner is turned ON. ■ Indications on the Function Number Display Indication 8 P 1 J U E F C H A L Function Blinks only one time upon turning on the scanner. Indicates that the scanner has been turned ON and is being initialized. Indicates that the scanner is ready for scanning. This means initialization has ended successfully after power-on. This status is called "Ready Status." Indicates that a recoverable error occurred during scanning with the scanner. "J" or "U" and an "error number" are displayed alternately. For details of the errors, refer to "Temporary Errors" in the Operator's Guide. After the error has been resolved, you can return to the Ready Status (see "1" above) by pressing the [Scan/Stop] or [Send to] button. Indicates that an abnormality (device error) occurred in the scanner during its initialization or during scanning documents. "E", "F", "C", "H", "A", or "L" and an "error number" are displayed alternately. When the error number is displayed, turn the Main Power Switch OFF and then ON again. If the error persists after this, contact the dealer where you purchased the scanner or an authorized FUJITSU scanner service provider. 11
-
 1
1 -
2
-
3
-
4
-
5
-
 6
6 -
 7
7 -
 8
8 -
 9
9 -
 10
10 -
 11
11 -
 12
12 -
 13
13 -
 14
14 -
 15
15 -
 16
16 -
17
-
18
-
19
-
20
-
21
-
22
-
23
-
24
-
25
-
26
 |
 |
