Fujitsu N6110 N6110 User's Guide - Page 43
Optical Drive - update
 |
View all Fujitsu N6110 manuals
Add to My Manuals
Save this manual to your list of manuals |
Page 43 highlights
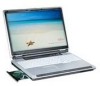
N6110.book Page 37 Wednesday, May 18, 2005 11:19 AM User-Installable Features 1 Figure 4-3. Optical Drive 2 1 DVD/CD Holder Tray 2 DVD/CD Eject Button Optical Drive Your Fujitsu LifeBook notebook contains an optical drive which is either a Dual-Layer Multi-Format DVD Writer or a DVD/CD-RW combo player. A Dual-Layer Multi-Format DVD Writer allows you to play CDs and DVDs, record CD-Rs and CD-RWs, and record DVD+/Rs, DVD+/-RWs, DVD+ R DLs, and DVD-RAMs. A DVD/CD-RW combo drive allows you to write data onto recordable CDs in addition to all of the standard DVD drive functions. OPTICAL DRIVE SOFTWARE DVD/CD-RW Combo model only: With the combo drive, you can play DVD movies, read audio CDs, and write data onto recordable CD-R or CD-RW discs. Dual-Layer Multi-Format DVD Writer model only: With this drive, you can play CDs and DVDs, record CD+/-Rs and CD+/-RWs, and record DVD-Rs, DVD+R DLs, DVD-RWs and DVD-RAMs. ■ Prior to using your Optical Drive, you must install the Optical Player software. Refer to the applicable readme file on the Driver Applications CD-ROM for instructions on installing your Optical Player software. ■ You should periodically check the Fujitsu Web site at: us.fujitsu.com/computers for current updated drivers. ■ Prolonged use of the optical drive, such as watching a DVD movie, will substantially reduce your battery life. Do not operate your optical drive unless your LifeBook notebook is sitting on a flat surface. Using a drive when the system is not level may damage the drive or prevent proper operation. LOADING MEDIA To load a disc into your optical drive, follow these steps: 1. Push and release the eject button on the front of the optical drive to open the holder tray. The tray will come out of the notebook a short distance. 2. Gently pull the tray out until a media disc can easily be placed in the tray. There may be a protective sheet in the tray from when it was shipped; please make sure it is removed before operating the drive, otherwise your drive may be damaged. 3. Place the media into the tray, label side up, with the hole in the center of the disc. Snap the disc onto the raised circle in the center of the tray. 4. Gently push the holder tray back in until you hear a click. (Figure 4-4) If you have disabled the Auto Insert Notification Function, you will have to start the drive from your desktop, since your notebook will not automatically recognize that media has been loaded. REMOVING MEDIA 1. Push and release the eject button on the front of the optical drive. This will stop the drive and the holder tray will come out of the notebook a short distance. 2. Gently pull the tray out until the disc can easily be removed from the tray. 3. Carefully remove the media disc from the holder tray. 4. Gently push the holder tray back in until you hear a click. 37
-
 1
1 -
2
-
3
-
4
-
5
-
6
-
7
-
8
-
9
-
10
-
11
-
12
-
13
-
14
-
15
-
16
-
17
-
18
-
19
-
20
-
21
-
22
-
23
-
24
-
25
-
26
-
27
-
28
-
29
-
30
-
31
-
32
-
33
-
34
-
35
-
36
-
37
-
 38
38 -
 39
39 -
 40
40 -
 41
41 -
 42
42 -
 43
43 -
 44
44 -
 45
45 -
 46
46 -
 47
47 -
 48
48 -
49
-
50
-
51
-
52
-
53
-
54
-
55
-
56
-
57
-
58
-
59
-
60
-
61
-
62
-
63
-
64
-
65
-
66
-
67
-
68
-
69
-
70
-
71
-
72
-
73
-
74
-
75
-
76
-
77
-
78
-
79
-
80
-
81
-
82
-
83
-
84
-
85
-
86
-
87
-
88
-
89
-
90
-
91
-
92
-
93
-
94
-
95
-
96
-
97
-
98
-
99
-
100
-
101
-
102
-
103
-
104
-
105
-
106
-
107
-
108
-
109
-
110
-
111
-
112
 |
 |
