Fujitsu N7010 N7010 User's Guide - Page 17
Top and Front Components, Display Panel Latch, Display Panel, Stereo Speakers, Support Button
 |
UPC - 611343083638
View all Fujitsu N7010 manuals
Add to My Manuals
Save this manual to your list of manuals |
Page 17 highlights
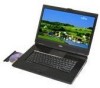
Top and Front Components The following is a brief description of your LifeBook notebook's top and front components. Display Panel Latch The display panel latch locks and releases the display panel. Display Panel The display panel is a color LCD panel with back lighting for the display of text and graphics. Stereo Speakers The built-in boxless dual speakers provide stereo sound. See "LifeBook notebook bottom panel" on page 19. Support Button The Support Button provides one-touch application launch capability. See "Using the Touch Zone Panel and Support Button" on page 34. Power/Suspend/Resume Button The Power/Suspend/Resume button allows you to suspend notebook activity without powering off, resume your notebook from Sleep mode, and power on your LifeBook notebook when it has been shut down. See "Power On" on page 46. Status Indicator Panel The Status Indicator Panel displays symbols that correspond to specific components of your LifeBook notebook. Note that status indicators appear in two areas above the keyboard on the left and right. See "Status Indicator Panel" on page 21. Memory Stick/SD Card Slot The Memory Stick/Secure Digital (SD) card slot allows you to insert a flash memory card for data storage. This architecture allows you to transfer data between a variety of different digital devices. See "Inserting Memory Stick/SD Cards" on page 71. 12 - Locating the Controls and Connectors
-
 1
1 -
2
-
3
-
4
-
5
-
6
-
7
-
8
-
9
-
10
-
11
-
 12
12 -
 13
13 -
 14
14 -
 15
15 -
 16
16 -
 17
17 -
 18
18 -
 19
19 -
 20
20 -
 21
21 -
 22
22 -
23
-
24
-
25
-
26
-
27
-
28
-
29
-
30
-
31
-
32
-
33
-
34
-
35
-
36
-
37
-
38
-
39
-
40
-
41
-
42
-
43
-
44
-
45
-
46
-
47
-
48
-
49
-
50
-
51
-
52
-
53
-
54
-
55
-
56
-
57
-
58
-
59
-
60
-
61
-
62
-
63
-
64
-
65
-
66
-
67
-
68
-
69
-
70
-
71
-
72
-
73
-
74
-
75
-
76
-
77
-
78
-
79
-
80
-
81
-
82
-
83
-
84
-
85
-
86
-
87
-
88
-
89
-
90
-
91
-
92
-
93
-
94
-
95
-
96
-
97
-
98
-
99
-
100
-
101
-
102
-
103
-
104
-
105
-
106
-
107
-
108
-
109
-
110
-
111
-
112
-
113
-
114
-
115
-
116
-
117
-
118
-
119
-
120
-
121
-
122
-
123
-
124
-
125
-
126
-
127
-
128
-
129
-
130
-
131
-
132
-
133
-
134
-
135
-
136
-
137
-
138
-
139
-
140
-
141
-
142
-
143
-
144
-
145
-
146
-
147
-
148
-
149
-
150
-
151
-
152
-
153
-
154
-
155
-
156
-
157
-
158
-
159
-
160
-
161
-
162
-
163
-
164
-
165
-
166
-
167
-
168
-
169
-
170
-
171
-
172
-
173
-
174
-
175
-
176
-
177
-
178
-
179
-
180
-
181
-
182
-
183
 |
 |
