Fujitsu S6520 S6520 User's Guide - Page 110
Video Problems, Problem, Possible Cause, Possible Solutions, Save Changes And Exit
 |
UPC - 611343085946
View all Fujitsu S6520 manuals
Add to My Manuals
Save this manual to your list of manuals |
Page 110 highlights
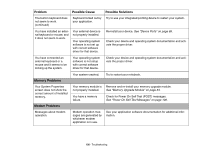
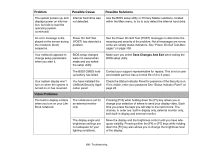
Problem Possible Cause Possible Solutions The system powers up, and displays power on information, but fails to load the operating system. (continued) Internal hard drive was not detected. Use the BIOS setup utility or Primary Master submenu, located within the Main menu, to try to auto detect the internal hard drive. An error message is displayed on the screen during the notebook (boot) sequence. Power On Self Test (POST) has detected a problem. See the Power On Self Test (POST) messages to determine the meaning and severity of the problem. Not all messages are errors; some are simply status indicators. See "Power On Self Test Messages" on page 108. Your notebook appears to change setup parameters when you start it. BIOS setup changes were not saved when made and you exited the setup utility. Make sure you select Save Changes And Exit when exiting the BIOS setup utility. The BIOS CMOS hold- Contact your support representative for repairs. This is not a user up battery has failed. serviceable part but has a normal life of 3 to 5 years. Your system display won't turn on when the system is turned on or has resumed. You have installed the LifeBook/Security Application panel. Check the Status Indicator Panel for presence of the Security icon. If it is visible, enter your password See "Status Indicator Panel" on page 23. Video Problems The built-in display is blank when you turn on your LifeBook notebook. The notebook is set for an external monitor only. Pressing [F10] while holding down the [Fn] key allows you to change your selection of where to send your display video. Each time you press the keys you will step to the next choice. The choices, in order are: built-in display only, external monitor only, both built-in display and external monitor. The display angle and brightness settings are not adequate for your lighting conditions. Move the display and the brightness control until you have adequate visibility. Pressing either the [F6] or [F7] keys while holding down the [Fn] key also allows you to change the brightness level of the display. 105 - Troubleshooting
-
 1
1 -
2
-
3
-
4
-
5
-
6
-
7
-
8
-
9
-
10
-
11
-
12
-
13
-
14
-
15
-
16
-
17
-
18
-
19
-
20
-
21
-
22
-
23
-
24
-
25
-
26
-
27
-
28
-
29
-
30
-
31
-
32
-
33
-
34
-
35
-
36
-
37
-
38
-
39
-
40
-
41
-
42
-
43
-
44
-
45
-
46
-
47
-
48
-
49
-
50
-
51
-
52
-
53
-
54
-
55
-
56
-
57
-
58
-
59
-
60
-
61
-
62
-
63
-
64
-
65
-
66
-
67
-
68
-
69
-
70
-
71
-
72
-
73
-
74
-
75
-
76
-
77
-
78
-
79
-
80
-
81
-
82
-
83
-
84
-
85
-
86
-
87
-
88
-
89
-
90
-
91
-
92
-
93
-
94
-
95
-
96
-
97
-
98
-
99
-
100
-
101
-
102
-
103
-
104
-
 105
105 -
 106
106 -
 107
107 -
 108
108 -
 109
109 -
 110
110 -
 111
111 -
 112
112 -
 113
113 -
 114
114 -
 115
115 -
116
-
117
-
118
-
119
-
120
-
121
-
122
-
123
-
124
-
125
-
126
-
127
-
128
-
129
-
130
-
131
-
132
-
133
-
134
-
135
-
136
-
137
-
138
-
139
-
140
-
141
-
142
-
143
-
144
-
145
-
146
-
147
-
148
-
149
-
150
-
151
-
152
-
153
-
154
-
155
-
156
-
157
-
158
-
159
-
160
-
161
-
162
-
163
-
164
-
165
-
166
-
167
-
168
-
169
-
170
-
171
-
172
-
173
-
174
-
175
-
176
-
177
-
178
-
179
-
180
-
181
-
182
-
183
-
184
-
185
-
186
-
187
-
188
-
189
-
190
-
191
-
192
-
193
-
194
-
195
-
196
-
197
-
198
-
199
-
200
-
201
-
202
-
203
 |
 |