Fujitsu T5010 T5010 Getting Started Guide - Page 1
Fujitsu T5010 - LifeBook Tablet PC Manual
 |
UPC - 611343085182
View all Fujitsu T5010 manuals
Add to My Manuals
Save this manual to your list of manuals |
Page 1 highlights
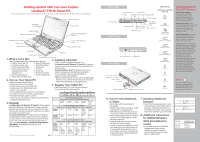
Getting started with your new Fujitsu LifeBook® T5010 Tablet PC This convenient guide will lead you through the start-up process in eight easy steps and will also offer some valuable tips. Optional Webcam Scroll Strip (for Tablet Mode) Display Panel Fingerprint Sensor Built-in Microphones LifeBook Security/Tablet PC Buttons Touchpad Cursor Control Left Button Right Button Power Suspend/Resume Switch Status Indicator Panel Scroll Strip Keyboard Status Indicator Panel Wireless Radio On/Off Switch 1. What's in the Box 4. Installing Click Me! Check to see that all of the following are in the box: ❍ LifeBook T Series Tablet PC ❍ Microsoft associated discs • Check to be sure the wireless radio switch is on. ❍ AC adapter and power cable ❍ Trusted Platform Module For Genuine Microsoft® Windows® XP Tablet PC: The first time ❍ Lithium ion battery (pre-installed) Application disc you boot up your system, you will see an icon called Click Me! CLICK ME ❍ Pen-kit including one pen, five ❍ Pen tether in the Start menu. additional pen tips, and tip ❍ Restore disc For Genuine Windows Vista™: In addition to an icon on the replacement tool ❍ Microfiber Cleaning Cloth desktop, a dialog box will automatically open that prompts ❍ Drivers and Application CD ❍ Third party application disc you to run Click Me!. Please proceed with ClickMe! to ❍ Warranty Terms & Conditions Booklet complete the system initial installation. • When you click the Click Me! icon, your system will automatically 2. Turn on Your Tablet PC • Plug the AC adapter into your Tablet PC. build the icon tray in the bottom right of the screen. These icons provide links to utilities that you will frequently access. • Plug the power cord into the AC adapter. • Connect the power cord to an electrical outlet. • Connect phone cord or Ethernet cable to your Tablet PC and to a wall jack. 5. Register Your Tablet PC Register your Tablet PC with Fujitsu Service and Support via our website (us.fujitsu.com/computers). • Press the Suspend/Resume switch to turn on the Tablet PC. • The Tablet PC is now on and the battery is being charged. • The Tablet PC will begin a power-on self test. • Once the self test is successfully completed, the operating system will begin the initialization process. Security Panel Button Functions (System State-pre-boot or resuming from suspend) 3. Register For Genuine Microsoft® Windows® XP Tablet PC: After the operating system has initialized, accept the Microsoft® Windows® Licensing Security Button 1 Security Button 2 Security Button 3 Security Button 4 Security Enter Button Pre-logon Tablet PC Button Functions (System State - pre-logon (Windows logon screen is displayed) Agreement and the Fujitsu End User License Agreement to proceed. Then enter the information as prompted to personalize your notebook and configure your modem* to dial. For Genuine Windows Vista™: Accept the Microsoft® Windows® Licensing Agreement and the Fujitsu End User License Agreement to proceed. Select your User ID and Password during the "Welcome Screen." Keep a record of your User ID and password stored in a secure place. THE SCREEN WILL GO DARK FOR APPROXIMATELY TWO MINUTES. Do not attempt to turn power on or off during this stage. * Wireless WAN model does not come with modem. Table 1 Notebook Function Rotate Screen Used to invoke secondary function Ctl+Alt+Del Button Secondary None None None Functions (Fn+ Button) Post-logon Tablet PC Button Functions (System State - pre-logon (Windows logon screen is displayed) Primary Page Page Rotate Secondary Ctl+Alt+ Del Notebook Down up Screen function Button Function Selection Secondary User- User- Display Fujitsu None Functions defined Defined Switching: Menu (Fn+ Button) Application Application 1. LED only Utility A (Default = B (Default = 2. CRT only Calculator) MS Journal) 3. Dual Display LEFT PANEL LED Indicators Microphone Jack PC Card Slot Button Icon and Name (Primary) Air Vents USB 2.0 Port PC Card Slot Eject Button Pen Garage Power DC Power Jack Headphone Jack Pen Tether Attachment Point Memory Stick/ SD Card Slot Smart Card Slot IEEE 1394 Jack RIGHT PANEL External Power Optical/Hard Drive Access Battery 1 Charging Battery 1 Level Anti-Theft Lock Slot Flexible Bay BACK PANEL Battery 2 Charging Battery 2 Level NumLk Anti-Theft Lock Slot Modem (RJ-11) Jack USB 2.0 Port Air Vents External Video Port USB 2.0 Port Gigabit LAN (RJ-45) Jack CapsLk ScrLk Security LifeBook Security/ Tablet PC Buttons Please refer to Table 1 The five security/Tablet PC buttons are located on the bottom right-hand side of the display when it is configured to be used as a notebook. Security functions: All five buttons are used when implementing security functions. Four of the buttons are used to enter the password, and the fifth is used as an Enter button. Tablet PC functions: The Tablet PC buttons have a number of functions, depending upon the state of the system: pre-logon state or post-logon state. The system is pre-logon when the Windows logon screen is displayed; the system is post-logon when the Windows desktop is displayed. All five of the buttons have primary functions. Several of the buttons also have secondary functions (see chart) when used as application buttons and are activated by pressing the Function (Fn) button while pressing the application button. In post logon, the secondary functions of the Application A and B buttons can be changed to launch any application. See User's Guide for more information about using the Security/Application Buttons. Drivers Look for the latest drivers on the Drivers and Applications CD. Right-click the FDU icon and select "update", or go to us.fujitsu.com/computers. 6. Convert from Notebook to Tablet • Lift the display until it is perpendicular to the keyboard. • Carefully rotate the display clockwise or counter clockwise until it is facing backwards. • Holding the top edge of the display panel, push it down until it is nearly on top of the keyboard. • Push the display latch down (the latch will pivot clockwise). The top latch disappears, and the bottom latch appears (A). • Holding the latch down, gently push down on the display until the latch engages. • To return to a notebook configuration, press the latch release button, and raise the screen until it is perpendicular to the keyboard. Be sure to turn the display in the direction indicated by the display rotation light and push the display latch so it faces forward (B). 7. Installing Additional Software • Load the Drivers and Applications disc to check for the latest versions of pre-installed drivers and applications. Install additional applications not pre-installed on your system, such as CyberLink Power Director and Make Disc (on select models). 8. Additional instructions for WWAN (Wireless Wide Area Network) model • If your system comes with a built-in Mobile Broadband module, please follow the installation and activation instructions, which are included in a separate package with your LifeBook Tablet PC. Top Latch B Display Side Bottom Latch A Display Side If you have: Dual-Layer Multi-Format DVD Writer You will need to install the following software: CyberLink Power Director and Make Disc
-
 1
1 -
 2
2
 |
 |
