Ganz Security LED-17 LED Series Maunal
Ganz Security LED-17 Manual
 |
View all Ganz Security LED-17 manuals
Add to My Manuals
Save this manual to your list of manuals |
Ganz Security LED-17 manual content summary:
- Ganz Security LED-17 | LED Series Maunal - Page 1
CCTV Monitor User Manual - Ganz Security LED-17 | LED Series Maunal - Page 2
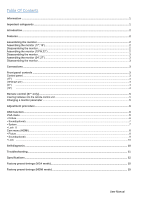
...6 VGA menu ...6 Picture ...6 Sound(optional) ...7 System ...7 Lock 8 Cam menu (HDMI) ...8 Picture ...8 Sound(optional) ...9 Lock ...10 Self-diagnosis ...10 Troubleshooting...11 Specifications...12 Factory preset timings (VGA mode)...15 Factory preset timings (HDMI mode) ...15 User - Ganz Security LED-17 | LED Series Maunal - Page 3
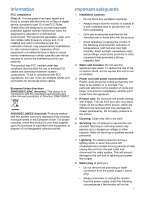
and, if not installed and used in accordance with the instruction manual, may cause harmful interference to radio communications. Operation of screen. 5. Cleaning: Clean only with a dry cloth. 6. Servicing: Do not attempt to service this unit yourself. Opening or removing covers may expose you to - Ganz Security LED-17 | LED Series Maunal - Page 4
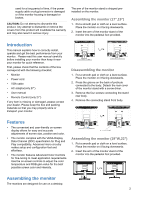
please check that the contents of the box correspond with the following checklist: • Monitor • Power cord • VGA cable • AC adaptor(only 27") • User manual • Remote Control (only 27") If any item is missing or damaged, please contact your dealer. Please keep the box and packing materials so that you - Ganz Security LED-17 | LED Series Maunal - Page 5
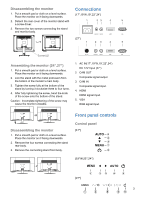
Disassembling the monitor 1. Put a smooth pad or cloth on a level surface. Place the monitor on it facing downwards. 2. Detach the rear cover of the monitor stand with a screw driver. 3. Remove the two screws connecting the stand and monitor body. Connections (17",19"W,19",22",24") (27") Screw(x2) - Ganz Security LED-17 | LED Series Maunal - Page 6
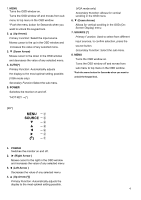
1. MENU Turns the OSD window on. Turns the OSD window off and moves from sub menu to top menu in the OSD window. *Push the menu button for 5seconds when you want to unlock the keypad lock. 2. ▲ (Up Arrow) Primary Function: Select the input source. Moves cursor to the up in the OSD window and - Ganz Security LED-17 | LED Series Maunal - Page 7
Remote control (27" only) R1 POWER Turn the monitor on from stand-by or off to stand-by mode. R2 TV/AV Select input signal source. R3 MUTE(optional) Mute or Unmute sound R4 NUMBER Button Press the buttons in order of MENU,7,8,9,0 to unlock the remote control lock.(27" only) R5 LAST CH Not used. R6 - Ganz Security LED-17 | LED Series Maunal - Page 8
Adjustment procedure Perform the Auto tracking Is the H.Size proper? No Adjust the Clock control. Yes Perform the H - V Position. Is the noise displayed on the screen? No Yes Adjust the Phase until the screen is cleared. Is the noise displayed on the End screen yet? Yes (Advanced - Ganz Security LED-17 | LED Series Maunal - Page 9
Choose automatically the proper horizontal position and vertical position and size of the screen image. 5-2 H-Position Adjust the position of the display horizontally (left or right). 5-3 V-Position Adjust the position of the display vertically (up or down). 5-4 Phase Remove any horizontal noise and - Ganz Security LED-17 | LED Series Maunal - Page 10
Monitor is turned off when it did not receive any signal from remote control or any button within the time that you set . (off/1Hour/2Hours/5Hours) (The screen warning is showed before automatic shutdown time that you set up) (Advanced Setting) 8. Memory Recall Reset the screen to the factory pre- - Ganz Security LED-17 | LED Series Maunal - Page 11
Sound(optional) (Time Setting) 1. Sound Mode Choose a different preset sound mode or your own customized sound. (Standard/ Movie/ Music/ User) 2. Balance Adjust the sound balance of the left and right speakers. 3. Bass When you select the user mode, adjust the bass sound. 4. Treble When you - Ganz Security LED-17 | LED Series Maunal - Page 12
-Diagnosis screen will be displayed. The self-diagnosis function checks if the status of the monitor screen is No Signal, Out of Range or None Supported. No Signal screen is displayed when the D- Sub signal connector is connected but the status of the monitor is on DPMS mode. Out of Range - Ganz Security LED-17 | LED Series Maunal - Page 13
Troubleshooting Symptom Picture is jittery No picture POWER LED is not lite that may cause electrical interference away from the monitor. See the FCC information at the front cover of the manual. Adjust Contrast and Brightness. Check if PICTURE mode has been set. Check if the video terminal is - Ganz Security LED-17 | LED Series Maunal - Page 14
Specifications Items Panel Interface Power Dimensions Weight VESA mount Specifications Hole patterns Operating temperature Screen size Pixel pitch View angle (H/V) Contrast ratio Response time Brightness Recommended resolution 17" 17in (43.2cm) 0.264 x 0.264 mm 170°/160° 1000:1 (typ) 5 ms 250 cd - Ganz Security LED-17 | LED Series Maunal - Page 15
Items Panel Interface Power Dimensions Weight VESA mount Specifications Hole patterns Operating temperature 19" Screen size 19 in. (48.3 cm) Pixel pitch 0.294 x 0.294 mm View angle (H/V) 170°/160° Contrast ratio 1000:1 (typ) Response time 5 ms Brightness 250 cd/m² (typ) Recommended - Ganz Security LED-17 | LED Series Maunal - Page 16
Items Panel Interface Power Dimensions Weight VESA mount Specifications Hole patterns Operating temperature 24" Screen size 23.6 in(59.95cm) Pixel pitch 0.2715(H) x 0.2715(V) View angle (H/V) 170°/160° Contrast ratio 1000:1 (typ) Response time 5 ms Brightness 250 cd/m² (typ) Recommended - Ganz Security LED-17 | LED Series Maunal - Page 17
Factory preset timings (VGA mode) Pixel Format 720 x 400 640 x 480 640 x 480 640 x 480 800 x 600 800 x 600 800 x 600 1024 x 768 1024 x 768 1024 x 768 1152 x 864 1280 x 1024 1280 x 1024 1360 x 768 1680 x 1050 1920 x 1080 Horizontal Freq.(KHz) 31.469 31.469 37.861 37.500 37.870 48.077 46.875 48.360 - Ganz Security LED-17 | LED Series Maunal - Page 18
MEMO. - Ganz Security LED-17 | LED Series Maunal - Page 19
MEMO. - Ganz Security LED-17 | LED Series Maunal - Page 20
SN:99786W0685
-
 1
1 -
 2
2 -
 3
3 -
 4
4 -
 5
5 -
 6
6 -
 7
7 -
8
-
9
-
10
-
11
-
12
-
13
-
14
-
15
-
16
-
17
-
18
-
19
-
20
 |
 |
CCTV
Monitor User Manual