Garmin Alpha 200i/TT 15 Dog Tracking Bundle Owners Manual - Page 17
Measuring Distance on the Map, Compass, Where To? Menu, Navigating with Sight 'N Go, Elevation Plot
|
View all Garmin Alpha 200i/TT 15 Dog Tracking Bundle manuals
Add to My Manuals
Save this manual to your list of manuals |
Page 17 highlights
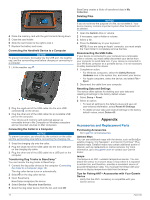
2 Select a track. 3 Select . The beginning and the end of the track are marked by flags. 4 Select the information bar along the top of the screen. Information about the track is listed. Viewing the Elevation Plot of a Track 1 Select Track Manager. 2 Select a track. 3 Select . Navigating to the Start of a Track You can navigate back to the beginning of a track. This can be helpful when finding your way back to camp or the trail head. 1 Select Track Manager > My Track > . 2 Select TracBack. Changing the Track Color 1 Select Track Manager. 2 Select a track. 3 Select > Color. 4 Select a color. Saving the Current Track 1 From the main menu, select Track Manager. 2 Select My Track > Save. Clearing the Current Track Select Track Manager > My Track > Discard. Deleting a Track 1 Select Track Manager. 2 Select a track. 3 Select > Delete. Navigation You can navigate routes and tracks to a waypoint, geocache, or any saved location in the device. You can use the map or the compass to navigate to your destination. Map represents your location on the map. As you travel, the icon moves and leaves a track log. Waypoint names and symbols appear on the map. When you are navigating to a destination, your route is marked with a line on the map. When the map orientation is Track Up, objects on the map appear to rotate around your position. As you travel, the entire map reorients in the direction you are facing. You can stabilize the objects by setting the orientation to North Up (Map Settings, page 15). To open the map, select . Measuring Distance on the Map You can measure the distance between two locations. 1 From the map, select a location. 2 Select > Measure Distance > Use. 3 Move the pin to another location on the map. Compass The handheld device has a 3-axis, tilt-compensated compass. You can use a bearing pointer or a course pointer to navigate to your destination. Calibrating the Compass NOTICE Calibrate the electronic compass outdoors. To improve heading accuracy, do not stand near objects that influence magnetic fields, such as vehicles, buildings, and overhead power lines. You should calibrate the compass after moving long distances, experiencing temperature changes, or removing the battery. 1 Select Compass > > Calibrate Compass > Start. 2 Follow the on-screen instructions. Navigating with the Bearing Pointer When navigating to a destination, points to your destination, regardless of the direction you are moving. 1 While navigating to a destination, select Compass. 2 Turn until points toward the top of the compass, and continue moving in that direction to the destination. Where To? Menu You can use the Where To? menu to find a destination to navigate to. Not all Where To? categories are available in all areas and maps. Finding a Waypoint by Name 1 Select Navigation > Where To? > Waypoints > Search. 2 Enter the name. 3 Select . > Spell Navigating with Sight 'N Go You can point the device at an object in the distance, lock in the direction, and navigate to the object. 1 Select Navigation > Compass > > Sight 'N Go. 2 Point the device at an object. 3 Select Lock Direction > Set Course. Elevation Plot By default, the elevation plot displays the elevation for an elapsed time. To open the elevation plot, select Track Manager > My Track > . Calibrating the Barometric Altimeter You can calibrate the barometric altimeter manually if you know the correct elevation or the correct barometric pressure. 1 Go to a location where the elevation or barometric pressure is known. 2 Select Track Manager > My Track > > > Altimeter Setup > Calibrate Altimeter. 3 Follow the on-screen instructions. Navigating to a Point on the Plot 1 Select Track Manager > My Track > . 2 Select an individual point on the plot. 3 Select > View Map. 4 Select Go. Changing the Plot Type You can change the elevation plot to display pressure and elevation over time or distance. 1 Select Track Manager > My Track > > > Altimeter Setup > Plot Type. 2 Select an option. Navigation 13
-
 1
1 -
2
-
3
-
4
-
5
-
6
-
7
-
8
-
9
-
10
-
11
-
 12
12 -
 13
13 -
 14
14 -
 15
15 -
 16
16 -
 17
17 -
 18
18 -
 19
19 -
 20
20 -
 21
21 -
 22
22 -
23
-
24
-
25
-
26
-
27
-
28
 |
 |
