Garmin Approach G10 Owners Manual - Page 5
Getting Started, Playing Golf - charger
 |
View all Garmin Approach G10 manuals
Add to My Manuals
Save this manual to your list of manuals |
Page 5 highlights
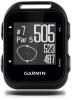
Getting Started WARNING See the Important Safety and Product Information guide in the product box for product warnings and other important information. Keys Playing Golf Before you can play golf, you must wait until the device acquires satellite signals, which may take 30 to 60 seconds. 1 Select Start Round. The device locates satellites and calculates your location. 2 Select a course from the list. 3 Follow the on-screen instructions to complete the setup and start a round. Hole View The device shows the current hole you are playing, and automatically transitions when you move to a new hole. NOTE: By default, the device calculates the distance to the front, middle, and back of the green. If you know the location of the pin, you can set it more precisely (Moving the Pin, page 1). Select to scroll through menus, holes, and settings. À Hold to turn the device on and off. Select to scroll through menus, holes, and settings. Á OK Select to select menu options and acknowledge messages. Â During play, select to open in-game features. BACK Select to return to the previous menu. Ã Turning On the Device The first time you turn on the device, you are prompted to configure system settings. 1 Hold . 2 Follow the on-screen instructions. Status Icons Battery status Sunrise Sunset Charging the Device WARNING This device contains a lithium-ion battery. See the Important Safety and Product Information guide in the product box for product warnings and other important information. NOTICE To prevent corrosion, thoroughly clean and dry the contacts and the surrounding area before charging or connecting to a computer. Refer to the cleaning instructions in the appendix. 1 Plug the USB cable into a USB port on your computer. 2 Align the charger posts with the contacts on the back of the device, and connect the charging clip securely to the À device. Current hole number. À Distance to the pin location. Á Distance to the back of the green. Â Distance to the front of the green. Ã Approximate view of the green. The pin position is indicated with +. Ä Par for the hole. Å Moving the Pin You can take a closer look at the green and move the pin location. 1 While playing golf, select OK. 2 Select Move Flag. 3 Select or to move the pin position. 4 Select OK. Measuring a Shot 1 While playing golf, select OK. 2 Select Measure Shot. 3 Walk to your ball. TIP: You can select to reset the measurement. Viewing Hazards You can view distances to hazards along the fairway for par 4 and 5 holes. Hazards that affect shot selection are displayed individually or in groups to help you determine the distance to layup or carry. 1 While playing golf, select OK. 2 Select Hazards. 3 Charge the device completely. 4 Press to remove the charger. Á Getting Started 1
-
 1
1 -
 2
2 -
 3
3 -
 4
4 -
 5
5 -
 6
6 -
 7
7 -
 8
8 -
 9
9 -
 10
10
 |
 |
