Garmin Colorado 300 Quick Start Guide - Page 2
Overview, Startup, Additional Functions, Basic Operation - maps install
 |
UPC - 753759067069
View all Garmin Colorado 300 manuals
Add to My Manuals
Save this manual to your list of manuals |
Page 2 highlights
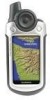
Overview WARNING: See the Important Safety and Product Information sheet in the product box for product warnings and other important information. Left soft key Rock 'n Roller Power key (backlight) Right soft key Color screen Weather cap Power key (backlight) Power key (backlight) USB mini-B jack (under weather cap) Startup Using the Rock 'n Roller™ • Rotate the Rock 'n Roller to move up and down menu lists. You can also move through the lists by pressing up, down, left, and right. ENTER key • Press ENTER to make all selections on the Colorado. Rock 'n Roller • Press up, down, left, and right on the Rock 'n Roller to pan the map. Using Soft Keys • The Left soft key and the Right soft key are used to access specific options that appear on the soft key labels. • When labeled, press the soft keys to show available menus. • If a soft key is not labeled, it is not available for that specific page. Mounting spine Latch Battery cover External GPS antenna connector (under weather cap) USB mini-B jack (under weather cap) Left soft key Soft key label Right soft key Soft key label Power key (backlight) Additional Functions To install batteries: 1. Remove the battery cover by lifting the latch and sliding the cover off the Colorado. Battery cover Latch 2. Insert the batteries, observing the diagram molded into the battery compartment. 3. Replace the battery cover by sliding it back onto the Colorado and fastening the latch. Battery compartment To attach the carabiner clip: 1. Position the carabiner clip in the slots on the mounting spine of the Colorado. 2. Slide the clip up until it locks in place. 3. To remove the carabiner clip, lift the bottom of the clip and gently push down on the carabiner clip until it releases. Carabiner clip Basic Operation First-time startup: 1. Press and hold the Power key until the Garmin logo appears on the screen. 2. Starting the Colorado the first time requires you to choose your language, time zone, and Daylight Saving mode. When the Language page appears, highlight the preferred language and press ENTER. 3. Highlight the preferred time zone and press ENTER. 4. Highlight the preferred Daylight Saving mode and press ENTER. The Colorado then shows the Map page. 5. Take your Colorado to an area with a clear view of the sky. 6. If the cursor on the Map page is blinking, wait for the Colorado to collect satellite data and establish its current location. 7. To turn off the Colorado, press and hold the Power key. Note: You must be outdoors with a clear view of the sky to acquire satellites. Carabiner Mounted on Colorado Language Time Zone Daylight Saving 190-00751-01_0A.indd 2 10/19/2007 10:36:11 AM
-
 1
1 -
 2
2
 |
 |
