Garmin DC 50 Dog Tracking Collar Owner's Manual - Page 8
About Collar Lock, Communication with the Collar, Tracking with BaseCamp™ BaseStation, Waypoints
|
View all Garmin DC 50 Dog Tracking Collar manuals
Add to My Manuals
Save this manual to your list of manuals |
Page 8 highlights
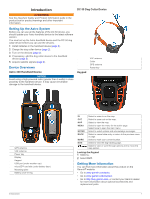
3 Select Show Info > MENU > Comm. Settings. 4 Select an unassigned and nonconflicting ID. 5 Change the update rate (optional). The 30-second and two-minutes rates reduce battery drain, but they record less-detailed dog tracks and statistics. 6 Bring the handheld device within a few feet of the dog collar device. 7 Follow the on-screen instructions. About Collar Lock You can use the collar lock feature to protect your dog's ID signal using a PIN. Other users with handheld devices must enter the PIN in order to track your dog. Other users with handheld devices can still add your dog by physically touching their handheld device to the dog collar device. Activating Collar Lock Before you can activate collar lock, you must turn on the dog collar device and bring it within 10 feet (3 m) of the handheld device. NOTE: If you forget the PIN, you can override the collar lock feature by physically touching the handheld device to the dog collar device. 1 Select DOG > ENTER > MENU. 2 Select Change PIN. 3 Enter a unique PIN. Communication with the Collar The handheld device and dog collar device use radio signals to communicate. Objects in the path of radio signals degrade the quality of the signals. Keeping an unobstructed line of sight between your handheld device and your dog's dog collar device produces the best communication signal. Obstructed radio waves result in a poor signal. To achieve the best line-of-sight conditions, you should move to the highest elevation point in your area (for example, on the top of a hill). Best Good Poor Tracking with BaseCamp™ BaseStation Before you can track your dogs and contacts using BaseCamp, you must download BaseCamp to your computer (www.garmin.com/ basecamp). The BaseStation feature of BaseCamp allows you to track your dogs and contacts in real-time on a computer. For more information on using BaseCamp, see the help file in the application. 1 Select Setup > System > BaseCamp Basestation > Prompted. 2 Open BaseCamp. 3 Follow the on-screen instructions. Waypoints, Routes, and Tracks Waypoints Waypoints are locations you record and store in the device. Marking Your Vehicle Location You can mark the location of your vehicle so you can navigate back to your vehicle after a hunt. 1 From the main menu, select Start New Hunt. 2 Follow the on-screen instructions. Marking Your Current Location 1 Select MARK. 2 Select an option: • Select New. • Select a default location name, such as Truck or Camp. 3 Select Save. Marking a Covey You can mark a covey location and enter the estimated number of birds flushed and the number of birds taken. 1 Select MARK. 2 Select Covey. 3 Enter the number of birds flushed. 4 Enter the number of birds taken. 5 Select OK. Marking a Waypoint Using the Map 1 Select MAP. 2 Select a location on the map. 3 Select ENTER > MENU > Save as Waypoint. Navigating to a Waypoint 1 From the main menu, select Find > Waypoints. 2 Select a waypoint. 3 Select Go. Editing a Waypoint Before you can edit a waypoint, you must create a waypoint. 1 From the main menu, select Tools > Waypoint Mgr. . 2 Select a waypoint. 3 Select an item to edit, such as the name. 4 Enter the new information. Finding a Waypoint by Name 1 From the main menu, select Find > Waypoints > MENU > Spell Search. 2 Enter the name. Matches appear as you select characters in the name. 3 Select the waypoint. Finding a Waypoint Near Another Waypoint 1 From the main menu, select Tools > Waypoint Mgr. . 2 Select a waypoint. 3 Select MENU > Find Near Here. 4 Select a category. The list includes waypoints near the original waypoint. Moving a Waypoint on the Map 1 From the main menu, select Tools > Waypoint Mgr. . 4 Waypoints, Routes, and Tracks
-
 1
1 -
2
-
 3
3 -
 4
4 -
 5
5 -
 6
6 -
 7
7 -
 8
8 -
 9
9 -
 10
10 -
 11
11 -
 12
12 -
 13
13 -
14
-
15
-
16
-
17
-
18
-
19
-
20
-
21
-
22
 |
 |
