Garmin Dash Cam Tandem Owners Manual - Page 5
Mounting Considerations, Connecting the Device to Vehicle Power - review
 |
View all Garmin Dash Cam Tandem manuals
Add to My Manuals
Save this manual to your list of manuals |
Page 5 highlights
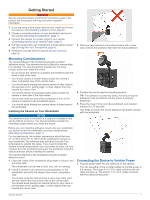
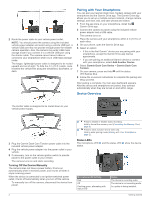
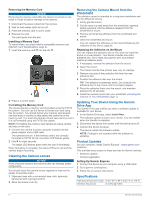
Getting Started WARNING See the Important Safety and Product Information guide in the product box for product warnings and other important information. 1 If you are using a third-party memory card, install and format the memory card (Installing a Memory Card, page 6). 2 Choose a mounting location on your windshield, and mount the camera (Mounting Considerations, page 1). 3 Connect the camera to a power outlet in your vehicle (Connecting the Device to Vehicle Power, page 1). 4 Pair the camera with your smartphone and the Garmin Drive™ app (Pairing with Your Smartphone, page 2). 5 Familiarize yourself with the camera (Device Overview, page 2). 3 After you have selected a mounting location with a clear view, remove the protective film from the mount adhesive. Mounting Considerations The camera affixes to the windshield using the included adhesive mount. The adhesive mount is difficult to remove after it is installed. You should carefully consider the mounting location before you install the mount. • Do not mount the camera in a location that interferes with the driver's view of the road. • You should choose a location that provides the camera a clear, unimpeded view of the vehicle cabin. • You should avoid placing the camera behind or very close to the rearview mirror, parking tags, or other objects that may impede the interior view. • You should choose a mounting location that provides the camera a clear view of the road ahead. • You should verify the area of the windshield in front of the camera is cleared by the windshield wipers. • You should avoid placing the camera behind a tinted area of the windshield. Installing the Camera on Your Windshield NOTICE The adhesive mount is intended for a long-term installation and can be difficult to remove. You should carefully consider the mounting location before you install the mount. Before you can install the adhesive mount onto your windshield, you should review the windshield mounting considerations (Mounting Considerations, page 1). For the best results, the ambient temperature should be from 21° to 38°C (from 70° to 100°F) while installing the camera on your windshield. The adhesive may not bond correctly if the temperature is outside this range. If you need to install the camera at lower temperatures, you must clear all snow, ice, and moisture from the windshield and warm the windshield using the vehicle defroster before installing the camera. The camera attaches to the windshield using the included adhesive mount. 1 Clean the inside of the windshield using water or alcohol, and a lint-free cloth. The windshield must be free of dust, wax, oils, or coatings. 2 Hold the camera in the desired mounting location on the windshield, and verify the camera has a clear, unimpeded view. You should verify the front lens has a clear view of the road and the interior lens has a clear view of the vehicle cabin. You should avoid placing the camera behind or very close to the rearview mirror, parking tags, or other objects that may impede the interior view. 4 Position the mount over the mounting location. TIP: The adhesive is extremely sticky. Avoid touching the adhesive to the windshield until the mount is properly positioned. 5 Press the mount firmly onto the windshield, and maintain pressure for 30 seconds. This helps to ensure the mount adhesive has proper contact with the windshield. Connecting the Device to Vehicle Power 1 Plug the power cable into the USB port on the camera. You can use either of the included cables to provide power to the camera. The longer 4 m (13 ft.) cable connects with the cable pointing up. The shorter 1.5 m (5 ft.) cable connects with the cable pointing down. Getting Started 1
-
 1
1 -
 2
2 -
 3
3 -
 4
4 -
 5
5 -
 6
6 -
 7
7 -
 8
8 -
 9
9 -
 10
10 -
 11
11 -
12
-
13
-
14
 |
 |
