Garmin Delta XC/Delta Sport„¢ XC Dog Device Owners Manual - Page 10
Checking the Battery Charge Level of the Dog Collar Device, Delta XC Battery Replacement Instructions
 |
View all Garmin Delta XC/Delta Sport„¢ XC Dog Device manuals
Add to My Manuals
Save this manual to your list of manuals |
Page 10 highlights
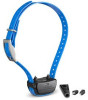
Operating temperature range Charging temperature range Storage temperature range (up to 1 mo.) Storage temperature range (up to 3 mo.) Storage temperature range (up to 1 yr.) Water rating From -20° to 50°C (from -4° to 122°F) From 0° to 40°C (from 32° to 104°F) From -20° to 60°C (from -4° to 140°F) From -20° to 45°C (from -4° to 113°F) From -20° to 30°C (from -4° to 86°F) IEC 60529 IPX7* *The device withstands incidental exposure to water of up to 1 m for up to 30 min. For more information, go to www.garmin.com /waterrating. Checking the Battery Charge Level of the Dog Collar Device Turn on the dog collar device. The status LED flashes every few seconds while the device is on. The color of the status LED indicates the battery charge level. Green Yellow Red The battery has a good charge. The battery has less than a 50% charge. The battery should be charged soon. Flashing Red The battery should be charged immediately. Training features are disabled. 1 Remove the six security screws from the back of the device. 2 Lift up the back plate. 3 Grip the battery connector wires close to the connector, and pull the connector parallel to the circuit board to disconnect the battery connector from the device. 4 Remove the old battery from the back plate, noting the orientation of the battery. The battery fits tightly. It may be necessary to pry the battery out of the back plate using a non-sharp, non-metal object. 5 Install the new battery into the back plate with the label side up, using the same orientation as the old battery. 6 With the new battery, connect the battery connector to the device. When properly installed, the connector plug snaps into the port. 7 Verify the gasket is not damaged and is completely seated in the groove. 8 Hold the back plate and the device firmly together, and replace all six security screws without tightening. 9 Verify the back plate and the device are aligned with no gaps. 10Tighten the screws evenly. Delta XC Dog Collar Device Components Delta XC Battery Replacement Instructions WARNING This product contains a lithium-ion battery. To prevent the possibility of personal injury or product damage caused by battery exposure to extreme heat, store the device out of direct sunlight. Do not use a sharp object to remove batteries. CAUTION Contact your local waste disposal department to properly recycle the batteries. Delta XC Handheld Device Components Security screws À Back plate Á Battery  Battery connector à Gasket Ä Replacing the Delta XC Handheld Device Battery Before you replace the battery, you must remove all dirt, water, and debris from the device. You also need the security screwdriver included with the new battery. You can purchase a replacement battery at http://buy.garmin.com. You should use only an official Garmin® replacement part. 6 Battery assembly À Gasket Á Battery connector  Device à Security screws Ä Replacing the Delta XC Dog Collar Device Battery Assembly Before you replace the battery, you must remove all dirt, water, and debris from the device. You also need the security screwdriver included with the new battery. You can purchase a replacement battery assembly at http://buy.garmin.com. You should use only a certified Garmin replacement part. The battery assembly includes a preassembled back plate with a gasket, battery, and battery connector. 1 Remove the four security screws from the corners of the device. 2 Lift up the battery assembly. 3 Grip the battery connector wires close to the connector, and pull the connector outward from the circuit board to disconnect the battery connector from the device. 4 With the new battery assembly, connect the battery connector to the device. When properly installed, the connector plug snaps into the port and the top face of the connector plug is flush with the edges of the port. 5 Verify the gasket is not damaged and is completely seated in the groove. Device Information
-
 1
1 -
2
-
3
-
4
-
 5
5 -
 6
6 -
 7
7 -
 8
8 -
 9
9 -
 10
10 -
 11
11 -
 12
12 -
 13
13 -
 14
14
 |
 |
