Garmin ECHOMAP Ultra 126sv Owners Manual PDF - Page 29
Panoptix Sonar Setup
 |
View all Garmin ECHOMAP Ultra 126sv manuals
Add to My Manuals
Save this manual to your list of manuals |
Page 29 highlights
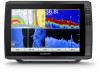
CHIRP generally performs better than single frequency applications. Because some fish targets may show up better using a fixed frequency, you should consider your goals and water conditions when using CHIRP frequencies. Some transducers also provide the ability to customize preset frequencies for each transducer element, which enables you to change the frequency quickly using the presets as the water and your goals change. Viewing two frequencies concurrently using the split-frequency view allows you to see deeper with the lower frequency return and, at the same time, see more detail from the higher frequency return. NOTICE Always be aware of local regulations on sonar frequencies. For example, to protect orca whale pods, you might be prohibited from using frequencies between 50 to 80 khz with in ½ mile of an orca whale pod. It is your responsibility to use the device in compliance with all applicable laws and ordinances. Selecting the Transducer Frequency NOTE: You cannot adjust the frequency for all sonar views and transducers. You can select which frequencies appear on the sonar screen. NOTICE Always be aware of local regulations on sonar frequencies. For example, to protect orca whale pods, you might be prohibited from using frequencies between 50 to 80 khz with in ½ mile of an orca whale pod. It is your responsibility to use the device in compliance with all applicable laws and ordinances. 1 From a sonar view, select Menu > Frequency. 2 Select a frequency suited to your needs and water depth. For more information on frequencies, see Sonar Frequencies, page 22. Creating a Frequency Preset NOTE: Not available with all transducers. You can create a preset to save a specific sonar frequency, which allows you to change frequencies quickly. 1 From a sonar view, select Menu > Frequency. 2 Select Add. 3 Enter a frequency. Turning On the A-Scope NOTE: This feature is available in the Traditional sonar views. The a-scope is a vertical flasher along the right side of the view, showing you what is underneath the transducer right now. You can use the a-scope to identify target returns that may be missed when the sonar data is quickly scrolling across the screen, such as when your boat is moving at high speeds. It can also be helpful for detecting fish that are close to the bottom. The a-scope above shows fish returns and a soft bottom return . From a sonar view, select Menu > Sonar Setup > Appearance > A-Scope. Panoptix Sonar Setup Adjusting the RealVü Viewing Angle and Zoom Level You can change the viewing angle of the RealVü sonar views. You can also zoom in and out of the view. From a RealVü sonar view, select an option: • To adjust the viewing angle diagonally, select . • To adjust the viewing angle horizontally, select . • To adjust the viewing angle vertically, select . • To adjust the viewing angle, swipe the screen in any direction. • To zoom in, spread two fingers apart. • To zoom out, pinch two fingers together. Adjusting the RealVü Sweep Speed You can update how quickly the transducer sweeps back and forth. A faster sweep rate creates a less detailed image, but the screen refreshes faster. A slower sweep rate creates a more detailed image, but the screen refreshes more slowly. NOTE: This feature is not available for the RealVü 3D Historical sonar view. 1 From a RealVü sonar view, select Menu > Sweep Speed. 2 Select an option. LiveVü Forward and FrontVü Sonar Menu From the LiveVü Forward or FrontVü sonar view, select Menu. Gain: Controls the level of detail and noise shown on the sonar screen. If you want to see the highest intensity signal returns on the screen, you can lower the gain to remove lower intensity returns and noise. If you want to see all return information, you can increase the gain to see more information on the screen. This also increases noise, and can make it more difficult to recognize actual returns. Depth Range: Adjusts the range of the depth scale. Allowing the device to adjust the range automatically keeps the bottom within the lower portion of the sonar screen, and can be useful for tracking a bottom that has minimal or moderate terrain changes. Manually adjusting the range enables you to view a specified range, which can be useful for tracking a bottom that has large terrain changes, such as a drop-offs or cliffs. The bottom can appear on the screen as long as it appears within the range you have set. Forward Range: Adjusts the range of the forward scale. Allowing the device to adjust the range automatically adjusts the forward scale in relation to the depth. Manually adjusting the range enables you to view a specified range. The bottom can appear on the screen as long as it appears within the range you have set. Manually reducing this option can reduce the effectiveness of the FrontVü Alarm, reducing your reaction time to low depth readings. Transmit Angle: Adjusts the focus of the transducer to the port or starboard side. This feature is available only with RealVü capable Panoptix transducers, such as the PS30, PS31, and PS60. Sonar Transmit: Stops the active transducer from transmitting. FrontVü Alarm: Sets an alarm to sound when the depth in front of the vessel is less than the specified value (Setting the FrontVü Depth Alarm, page 24). This is available only with Panoptix FrontVü transducers. Sonar Setup: Adjusts the setup of the transducer and the appearance of the sonar returns. Sonar Fishfinder 23
-
 1
1 -
2
-
3
-
4
-
5
-
6
-
7
-
8
-
9
-
10
-
11
-
12
-
13
-
14
-
15
-
16
-
17
-
18
-
19
-
20
-
21
-
22
-
23
-
 24
24 -
 25
25 -
 26
26 -
 27
27 -
 28
28 -
 29
29 -
 30
30 -
 31
31 -
 32
32 -
 33
33 -
 34
34 -
35
-
36
-
37
-
38
-
39
-
40
-
41
-
42
-
43
-
44
-
45
-
46
-
47
-
48
-
49
-
50
-
51
-
52
 |
 |
