Garmin Edge Explore Owners Manual - Page 6
Installing the Standard Mount, Going for a Ride - bike computer
 |
View all Garmin Edge Explore manuals
Add to My Manuals
Save this manual to your list of manuals |
Page 6 highlights
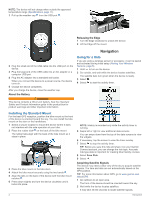
NOTE: The device will not charge when outside the approved temperature range (Specifications, page 11). 1 Pull up the weather cap from the USB port . Releasing the Edge 1 Turn the Edge clockwise to unlock the device. 2 Lift the Edge off the mount. Navigation 2 Plug the small end of the USB cable into the USB port on the device. 3 Plug the large end of the USB cable into an AC adapter or a computer USB port. 4 Plug the AC adapter into a standard wall outlet. When you connect the device to a power source, the device turns on. 5 Charge the device completely. After you charge the device, close the weather cap. About the Battery WARNING This device contains a lithium-ion battery. See the Important Safety and Product Information guide in the product box for product warnings and other important information. Going for a Ride If you are using a wireless sensor or accessory, it can be paired and activated during initial setup (Pairing Your Wireless Sensors, page 6). 1 Hold to turn on the device. 2 Go outside, and wait while the device locates satellites. The satellite bars turn green when the device is ready. 3 Select . 4 Select to start the activity timer. Installing the Standard Mount For the best GPS reception, position the bike mount so the front of the device is oriented toward the sky. You can install the bike mount on the stem or the handlebars. 1 Select a secure location to mount the device where it does not interfere with the safe operation of your bike. 2 Place the rubber disk on the back of the bike mount. The rubber tabs align with the back of the bike mount so it stays in place. 3 Place the bike mount on the bike stem. 4 Attach the bike mount securely using the two bands . 5 Align the tabs on the back of the device with the bike mount notches . 6 Press down slightly and turn the device clockwise until it locks into place. 2 NOTE: History is recorded only while the activity timer is running. 5 Swipe left or right to view additional data screens. You can swipe down from the top of the data screens to view the widgets. 6 If necessary, tap the screen to view the timer overlay. 7 Select to stop the activity timer. TIP: Before you save this ride and share it on your Garmin Connect account, you can change the ride type. Accurate ride type data is important for creating bike friendly courses. 8 Select Save Ride. 9 Select . Acquiring Satellite Signals The device may need a clear view of the sky to acquire satellite signals. The time and date are set automatically based on the GPS position. TIP: For more information about GPS, go to www.garmin.com /aboutGPS. 1 Go outdoors to an open area. The front of the device should be oriented toward the sky. 2 Wait while the device locates satellites. It may take 30-60 seconds to locate satellite signals. Navigation
-
 1
1 -
 2
2 -
 3
3 -
 4
4 -
 5
5 -
 6
6 -
 7
7 -
 8
8 -
 9
9 -
 10
10 -
 11
11 -
 12
12 -
13
-
14
-
15
-
16
-
17
-
18
-
19
-
20
 |
 |
